In summary:
- Design seating for a water depth of 50 cm (20 inches) to enable comfortable, chest-level conversation.
- Integrate a 10-15 degree angled backrest with a subtle lumbar curve to provide active ergonomic support.
- Use smooth, large-format tiles or polished plaster to prevent swimwear abrasion and enhance comfort.
- Ensure proper water circulation under benches with coved transitions and dedicated return jets to prevent algae growth.
- Plan for hydrotherapy features like jets and bubblers during the initial design phase to transform your pool into a wellness lounge.
The image of a pool has evolved. Once a simple rectangle for swimming laps, it is now the centerpiece of outdoor living—a social lounge where memories are made. Yet, many homeowners find their in-pool seating areas go unused. The reason is often a simple oversight: a lack of ergonomic design. Standard pool benches are frequently built as flat, hard afterthoughts, forcing bathers into uncomfortable postures that lead to back and neck strain. This transforms a potential oasis of relaxation into a place of subtle discomfort.
The conventional wisdom is simply to “add a bench.” But this approach misses the point entirely. True comfort isn’t accidental; it’s engineered. The key to creating a pool you’ll genuinely love to linger in lies in the science of hydro-ergonomics. This is the understanding that the body, partially supported by the buoyancy of water, has unique needs. It requires specific depths, angles, and surfaces to achieve a state of true, weightless relaxation.
This guide moves beyond generic advice. We will deconstruct the core principles of ergonomic in-pool seating. Instead of just listing features, we will explore the precise dimensions that foster conversation, the structural angles that provide genuine lumbar support, and the design choices that turn a simple ledge into a therapeutic retreat. It’s time to stop building seats that merely tolerate the body and start designing social spaces that actively comfort it.
This article provides a detailed roadmap for integrating these comfort-focused principles into your pool design. Below, you will find a breakdown of the key considerations, from foundational dimensions to luxury enhancements, ensuring every element contributes to a sublime and pain-free aquatic experience.
Summary: Designing a Pain-Free Pool Lounge
- Why is a 50cm depth crucial for comfortable chest-deep conversation?
- How to angle the pool wall to provide lumbar support?
- Tile or Plaster: Which Seat Finish is Gentler on Swimwear?
- The design error that allows algae to grow under the bench
- When to install calf-massage jets into the bench structure?
- Why Baja Shelves Are the Most Requested Feature for Families with Toddlers?
- Why Shotcrete is the Only Viable Option for Complex Free-Form Pool Designs?
- How Hydrotherapy Features Transform a Simple Pool into a 5-Star Resort?
Why Is a 50cm Depth Crucial for Comfortable Chest-Deep Conversation?
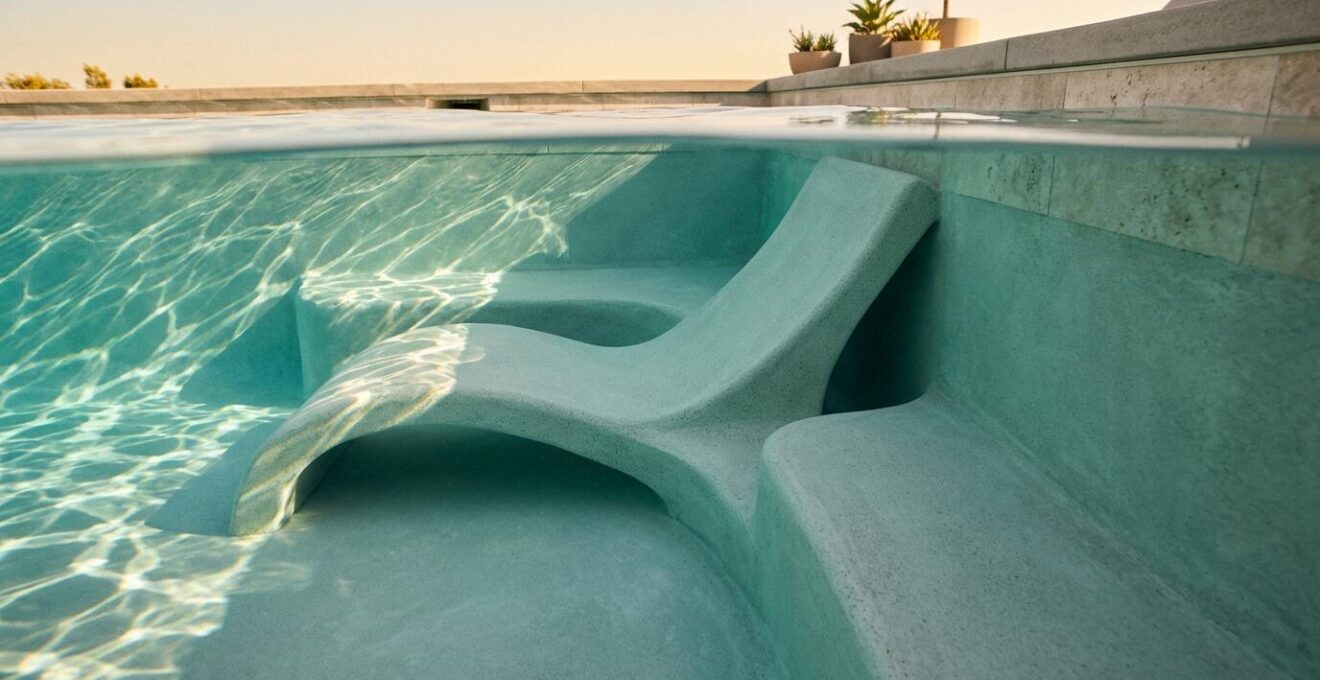
The perfect in-pool bench isn’t just a place to sit; it’s a social platform. The primary goal of ergonomic seating is to facilitate effortless conversation, which is only possible when participants are at a comfortable, buoyant, and conversational height. This is where the concept of “Social Depth” becomes critical. A depth of approximately 50 cm (around 20 inches) allows an average-sized adult to sit with the water level at their mid-to-upper chest. This specific depth provides a feeling of comfortable immersion and buoyancy without forcing them to tread water or feel uncomfortably exposed.
This dimension is not arbitrary. It’s a balance between comfort and safety. In fact, many swimming pool safety codes stipulate a 20 inches (508 mm) maximum depth for underwater benches to ensure users can safely rest. At this depth, the body feels light, reducing stress on the spine and joints, while the head and shoulders remain well above the water for easy communication. A bench that is too shallow forces a person to slouch to stay immersed, while one that is too deep can cause water to lap uncomfortably around the neck and chin.
Case Study: The Las Vegas Multi-Depth Bench
A homeowner in Las Vegas installed an extensive 47-foot bench with sections at varying depths. After extensive use, they found the 28-inch deep sections were ideal for taller adults (5’10” and above), keeping the water at a relaxing neck level. However, they noted that the most versatile and frequently used areas were the 18 to 22-inch sections, which were perfect for a wider range of guests and made it easier to reach for drinks on the pool deck. This real-world experience highlights the value of a split-level approach to accommodate different body types and create distinct relaxation zones.
Ultimately, designing for a 50cm depth isn’t just about following a rule; it’s about understanding the human factor. By creating a space where the body is perfectly supported by water, you enable social interaction to flourish naturally and comfortably for hours on end.
How to Angle the Pool Wall to Provide Lumbar Support?
A flat, 90-degree wall behind a pool bench is one of the most common design flaws leading to back pain. When a person leans back against a vertical surface, their lower back (the lumbar region) is left unsupported, forcing muscles to tense up to maintain posture. True ergonomic design provides active support, meaning the structure itself conforms to the body’s natural curves. For in-pool seating, this is achieved by angling the backrest and incorporating a subtle lumbar curve.
From an ergonomic perspective, the ideal backrest is not vertical but reclined at an angle of 10 to 15 degrees. This slight recline shifts the user’s center of gravity, allowing them to relax fully against the surface without sliding. More importantly, this angled wall should not be flat. To provide proper lumbar support, it needs a gentle, convex curve that presses lightly into the lower back. This seemingly minor detail makes a world of difference, as it helps maintain the natural ‘S’ shape of the spine, preventing the fatigue and pain that comes from prolonged slouching.
This level of precision is critical for delivering a truly therapeutic experience. The illustration below shows a cross-section of this ergonomic design, highlighting the angled backrest and integrated lumbar support.
As the diagram demonstrates, the design provides a supportive cradle for the spine. According to Cornell University ergonomics research, a supportive backrest should accommodate a 0.6 to 2.0 inches lumbar curve depth. This specification, while seemingly small, is the key to preventing lower back strain and transforming a simple bench into a restorative lounger. Achieving this requires a construction method, like shotcrete, that allows for such custom, free-form shaping.
Tile or Plaster: Which Seat Finish Is Gentler on Swimwear?
The ergonomic comfort of in-pool seating extends beyond dimensions and angles; it includes the tactile experience of the surface itself. The finish of your pool bench has a direct impact on both skin comfort and the lifespan of your swimwear. A rough, abrasive surface can feel unpleasant and quickly cause pilling and fabric degradation, turning a luxury investment into a source of frustration. The choice between finishes like tile, plaster, or pebble is therefore a crucial decision in the pursuit of ultimate comfort.
A smooth, non-porous surface is always the superior choice for seating areas. Rougher finishes like standard plaster or exposed pebble can act like fine-grit sandpaper against delicate swimwear fabrics and sensitive skin, especially with prolonged contact. While these materials are durable, their texture is a significant comfort compromise. For the gentlest touch, large-format tile with minimal grout lines (especially epoxy grout, which is less abrasive than cementitious grout) and polished plaster finishes are the leading options. Glass tile is particularly prized for its exceptionally smooth surface.
The following table compares the most common finishes, focusing on the factors that matter most for underwater seating: impact on swimwear, maintenance requirements, and how the material feels to the touch.
| Finish Type | Swimwear Impact | Maintenance | Thermal Properties |
|---|---|---|---|
| Large Format Tile | Gentle with epoxy grout | Easiest to clean | Feels cooler initially |
| Glass Tile | Very smooth, minimal wear | Algae-resistant | Quick to warm up |
| Polished Plaster | Smooth when new | Moderate maintenance | Neutral temperature |
| Pebble Finish | Textured, more abrasive | Prone to algae in pores | Retains heat well |
As a recent comparative analysis of pool features shows, modern design increasingly favors smoother finishes for high-contact areas. While pebble finishes are excellent for general pool surfaces due to their durability, seating zones demand a higher standard of tactile quality. Opting for a polished or tiled finish ensures that your relaxation spot is as kind to your swimwear as it is to your back.
The Design Error That Allows Algae to Grow Under the Bench
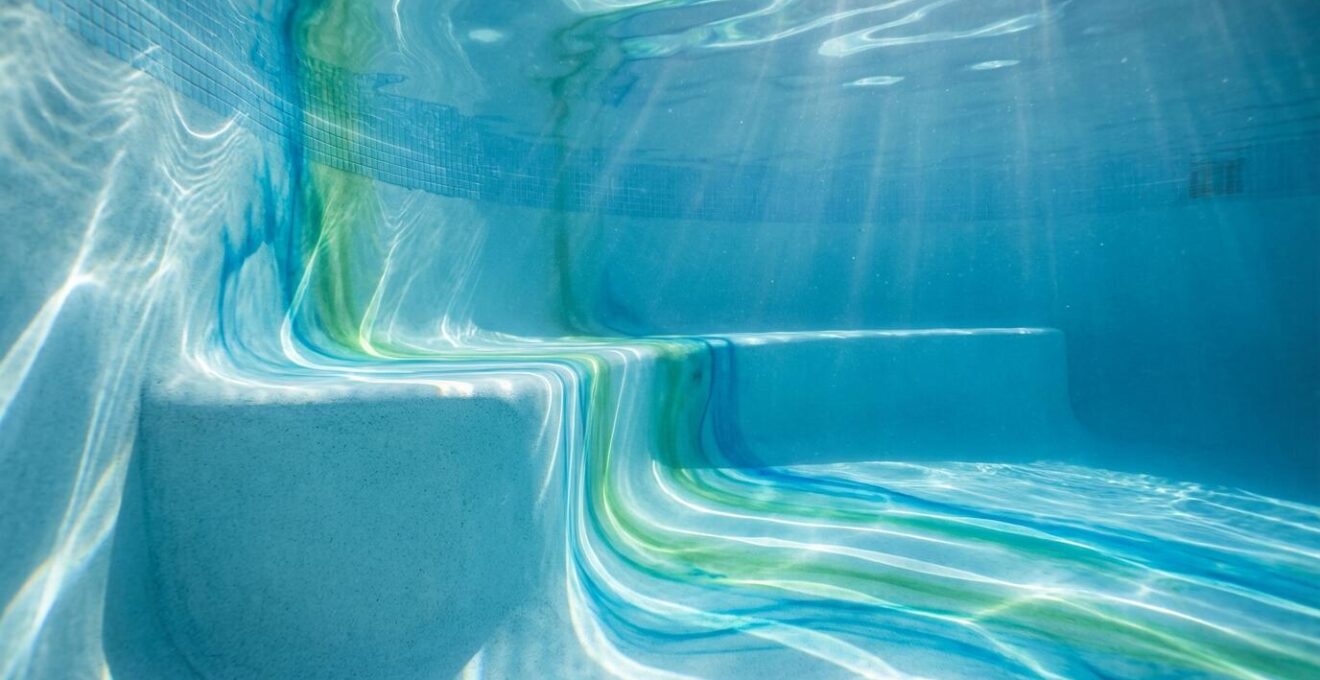
A pristine, inviting pool bench can quickly become an unsightly maintenance headache if one critical factor is overlooked in its design: water circulation. The space beneath an underwater bench, especially where it meets the pool floor and wall, can easily become a “dead zone” with stagnant water. These low-flow areas are the perfect breeding ground for algae, creating persistent green or black patches that are difficult to clean and ruin the aesthetic of your pool lounge.
This is not a chemical problem; it’s a hydrodynamic design flaw. The most common mistake is creating sharp, 90-degree angles at the base of the bench. These corners trap debris and prevent chemically treated water from circulating effectively. The solution lies in creating smooth, coved transitions. A gentle, curved radius where the bench meets the floor and wall eliminates corners where algae can take hold. This principle of “designing out” problems is fundamental to low-maintenance pool ownership.
To further guarantee circulation integrity, dedicated return jets should be installed low on the opposite wall, aimed directly at the under-bench area to create a constant sweeping current. The illustration below visualizes this concept, showing how a smooth, coved design combined with targeted water flow maintains a clean, algae-free environment.
By focusing on fluid dynamics during the design phase, you prevent maintenance issues before they ever arise. An ergonomically sound bench is also one that integrates seamlessly with the pool’s cleaning and filtration systems, ensuring it remains as beautiful and inviting as the day it was installed.
Action Plan: Audit for Under-Bench Algae Prevention
- Coved Transitions: Verify that all design plans specify smooth, curved transitions instead of 90-degree angles where the bench meets the pool wall and floor.
- Dedicated Circulation: Ensure the plan includes low-profile return jets specifically positioned and aimed to sweep water underneath all seating areas.
- Flow-Friendly Placement: Review the bench placement to confirm it doesn’t create large, obstructed zones. Consider ‘swim-out’ designs external to the main perimeter to maximize flow.
- Depth and Clearance: Check that the bench design maintains sufficient clearance (a minimum of 18 inches is recommended) to allow for robust water flow patterns around all edges.
- Avoid Overhangs: Eliminate any overhanging bench designs that create permanently shaded, stagnant water zones beneath them, as these are prime locations for algae growth.
When to Install Calf-Massage Jets into the Bench Structure?
Integrating hydrotherapy jets into a pool bench elevates it from a simple resting spot to a personalized massage station. However, this is not a feature that can be added later. The decision to install jets, and their precise placement, must be made during the earliest stages of the pool’s design. The process involves embedding plumbing directly into the pool’s structure before any concrete is poured, making it a foundational choice, not an accessory.
The optimal time to finalize jet installation is during the initial design phase with your pool builder. This is when you can specify the number of jets, their location, and the desired therapeutic effect. Do you want a gentle, bubbling sensation or a powerful, deep-tissue massage? The answer will determine the type of jets and the dedicated plumbing required. For calf massage, jets should be positioned in pairs at varying heights along the front of the bench to accommodate different leg lengths and target the gastrocnemius muscle effectively.
Once the design is set, the installation follows a critical timeline tied to the pool’s construction:
- Rebar Phase: The exact positions for the jets are marked on the steel rebar skeleton that forms the pool’s frame.
- Pre-Shotcrete Plumbing: Dedicated plumbing loops for the jets are installed and pressure-tested. This must be completed before the concrete shell is applied.
- Pump and Valve System: A separate booster pump or a diverter valve system is plumbed in to allow for independent control of the jets, so they can be turned on or off separately from the main pool filtration system.
- Shotcrete Application: The concrete is applied over the rebar and plumbing, permanently encasing the jet bodies in the bench structure.
This process underscores why jet installation is an upfront commitment. By planning for hydrotherapy from day one, you seamlessly integrate a powerful wellness feature that adds immense value and therapeutic benefit to your poolside experience.
Why Baja Shelves Are the Most Requested Feature for Families with Toddlers?
A Baja shelf—also known as a tanning ledge or sun shelf—is a large, shallow area in a pool that has become one of the most sought-after features, especially for homeowners with young children. Its appeal lies in its incredible versatility. For adults, it’s a luxurious space to place a lounge chair and relax in the sun with feet dangling in the water. For families, it’s a game-changer: a safe, built-in aquatic playground for toddlers.
The magic of a Baja shelf is its carefully engineered depth. Unlike the first step of a pool, which is purely functional for entry, a sun shelf is designed for lingering. According to leading manufacturing standards, a depth of 9 to 12 inches (23 to 30 cm) is the sweet spot. This depth is shallow enough for toddlers to sit, splash, and play safely under supervision, giving them a sense of independence and water confidence. It effectively creates a “kiddie pool” within the main pool, eliminating the need for a separate, plastic alternative.
Case Study: The Multi-Generational Sun Ledge
A popular modern design approach involves creating an extended first step that doubles as a Baja shelf. These ledges often range from 4 to 8 feet in length with depths varying from 3 to 18 inches. This dual-purpose design provides a safe, expansive shallow area perfect for young children to play. Simultaneously, it creates a sophisticated relaxation zone for adults, who can supervise while lounging in the shallow water. This multi-generational functionality is why the feature is so consistently requested; it serves every member of the family.
Furthermore, many Baja shelves are designed with umbrella sleeves and integrated bubblers, which add to the sensory fun for kids and the resort-like ambiance for adults. This ability to be both a safe play area and a chic lounging space is the core reason for its immense popularity. It transforms a section of the pool into a multi-functional hub that caters to the needs of every generation.
Why Shotcrete Is the Only Viable Option for Complex Free-Form Pool Designs?
When designing a pool with ergonomic benches, lumbar supports, and flowing, organic shapes, the construction material is not just a detail—it’s the enabler of the entire vision. While other methods like vinyl liner or fiberglass exist, shotcrete is the only material that offers the structural plasticity required for true, custom-formed comfort. Fiberglass pools are limited to pre-fabricated factory molds, and vinyl liners are stretched over panel walls, making complex curves and integrated seating difficult and costly.
Shotcrete, which is concrete pneumatically applied over a steel rebar frame, is fundamentally different. It is a monolithic, sculptural method. This process allows builders to create virtually any shape imaginable, directly on-site. The rebar skeleton is bent and formed to the exact ergonomic specifications of the design—including the 15-degree backrest angle, the subtle lumbar curve, and the multi-level bench depths. The shotcrete is then applied over this “skeleton,” forming a single, seamless, and incredibly strong structure.
The real magic happens in the moments after the shotcrete is applied. During this critical “green” phase, skilled artisans hand-carve and shape the concrete before it fully cures. This allows for an unparalleled level of customization:
- Precise Rebar Skeleton: The process begins with creating a steel framework bent to the exact ergonomic specifications.
- Client Skeleton Review: Homeowners can often review the rebar “skeleton” before concrete application to visualize and approve the final shapes.
- Pneumatic Application: Shotcrete is sprayed on to form a dense, monolithic structure around the rebar.
- Hand-Carving Phase: During the crucial “green” phase, artisans hand-carve the bench angles, curves, and transitions to perfection.
- Real-Time Comfort Test: Some builders even have the homeowner physically sit on the rough form to make real-time adjustments for optimal comfort before the final plaster coat.
This hands-on, sculptural approach is why shotcrete is synonymous with high-end, custom pools. It’s the only method that can reliably deliver the nuanced, body-contouring forms that are the hallmark of a truly ergonomic and pain-free pool lounge.
Key takeaways
- Ergonomic design prioritizes a “Social Depth” of around 50cm (20 inches) to facilitate comfortable, chest-deep conversation.
- True back support is active, not passive, requiring a 10-15 degree angled backrest with an integrated lumbar curve.
- Superior design prevents future problems, such as using coved transitions and ensuring proper water circulation to eliminate algae growth under benches.
How Hydrotherapy Features Transform a Simple Pool into a 5-Star Resort?
The ultimate goal of ergonomic pool design is to transcend basic recreation and create a holistic wellness experience. This transformation is achieved by thoughtfully integrating hydrotherapy features that turn your backyard pool into a private, 5-star resort. It’s about moving beyond a place to cool off and creating a destination for restoration, relaxation, and therapeutic relief. Features like targeted jets, effervescent bubblers, and heated spas are the key components of this upgrade.
This isn’t just about adding features randomly; it’s about creating a full sensory journey. Rain curtain waterfalls can provide a gentle massage for the neck and shoulders. Effervescent bubblers installed on a Baja shelf create a calming, champagne-like sensory experience. Powerful, deep-tissue jets, positioned at multiple heights within a bench, can target specific muscle groups like the lower back and calves, offering genuine therapeutic benefits after a long day or a workout. This level of detail is explored in research on ergonomic excellence in smart hot tub seating, where jet placement and seat contouring are engineered for maximum therapeutic impact.
Case Study: The Integrated Smart Spa
High-end modern designs often incorporate a “spillover spa”—a hot tub integrated into the pool structure that can be heated and operated independently. This creates a dual-zone environment: a cool pool for recreation and a hot spa for therapy. These smart spas feature multi-level, contoured seating with strategically placed jets, often enhanced with programmable chromatherapy (colored LED lighting) and aromatherapy injectors. This creates an immersive experience that engages all the senses, rivaling the amenities of a luxury wellness retreat.
By combining the ergonomic principles of supportive seating with the therapeutic power of moving water and heat, you complete the transformation. The pool is no longer just a body of water; it becomes an integrated hydrotherapy system. Every element—from the depth of the bench to the position of a jet—works in concert to deliver comfort, relaxation, and a daily touch of resort-style luxury.
By embracing these ergonomic principles, your pool design shifts from a simple construction project to the creation of a personalized wellness sanctuary. The next logical step is to consult with a design professional who can translate these concepts into a concrete plan tailored to your space and lifestyle.