
Contrary to popular belief, a trip hazard around your pool isn’t a simple repair job—it’s a critical symptom of systemic failure in your deck’s safety and construction.
- The root cause is never just the uneven surface; it’s a chain of failure involving poor drainage, compromised expansion joints, or incorrect material selection.
- A superficial fix without a full diagnostic audit almost guarantees the problem will return, often with greater cost and risk.
Recommendation: Treat the entire coping-to-deck transition as a single, integrated safety system, not a collection of separate parts.
The transition from your pool coping to the surrounding deck is the single most critical safety zone in your backyard. For families with energetic children or elderly relatives, even a slight height difference creates a constant, unacceptable risk. Most homeowners treat a raised paver or a cracked joint as a simple maintenance task. This is a grave error. From a safety inspector’s perspective, any trip hazard is not an isolated issue; it is a clear signal of a systemic failure in the design and construction of your pool area. Ignoring the root cause is not just negligent—it’s an invitation for injury.
The common advice focuses on superficial fixes: patch the crack, grind the concrete. These are temporary measures that fail to address the underlying forces at play, such as water infiltration, soil erosion, and the differential movement of materials under thermal stress. To permanently eliminate these dangers, you must adopt the mindset of an inspector and conduct a forensic audit of the entire system. This is not about aesthetics; it is about enforcing a non-negotiable standard of safety.
This guide provides the official protocol for diagnosing and rectifying these hazards. We will deconstruct the chain of failure, from foundational drainage errors to the molecular properties of your chosen materials. By understanding the ‘why’ behind the failure, you will be equipped to implement a permanent solution that ensures zero-threshold integrity and lasting peace of mind.
This article details the complete inspection and remediation process. Each section dissects a critical control point in your pool’s safety system, providing the standards and procedures necessary to ensure a hazard-free environment.
Summary: Eliminating Pool Deck Trip Hazards
- How to level coping stones with the deck for a zero-threshold look?
- Silicone or Foam: Which Expansion Joint Material Prevents Cracking Best?
- Why is Bullnose coping safer for swimmers exiting the pool?
- The drainage error that causes pavers to heave above the coping level
- When to seal the joint between coping and deck to prevent water infiltration?
- Why Travertine Stays Cooler Than Granite on Hot Summer Days?
- How to Select Hardscaping Materials That Stay Cool Under the Summer Sun?
- How to Choose Mosaic Tiles That Won’t Pop Off After Three Winters?
How to level coping stones with the deck for a zero-threshold look?
The goal of a pool deck is zero-threshold integrity. Any change in elevation between the coping and the deck is a violation of this fundamental safety principle. There is no acceptable tolerance for a trip hazard. Building codes are clear on this matter; for example, regulations in high-traffic pool areas often cite that any deviation over a fraction of an inch constitutes a non-compliant hazard. An official inspection confirms that a 2-inch difference is generally considered a tripping hazard, mandating that coping must align flush with the deck.
Achieving this standard requires a correct diagnosis of the height discrepancy’s cause and magnitude. Different methods are prescribed for different situations, from minor surface abrasion to significant structural lifting. It is critical to apply the correct remediation, as an improper choice will fail to solve the problem and may cause further damage. The choice is not a matter of preference but of procedural necessity.
The following table outlines the professionally recognized methods for leveling concrete or pavers. This is not a menu of options; it is a guide to determine the required procedure based on the severity of the displacement. Costs and timelines are provided for planning purposes, but safety, not budget, must dictate the final decision.
| Height Difference | Method | Time | Cost Range |
|---|---|---|---|
| <1/4 inch | Concrete grinding | 2-4 hours | $300-$800 |
| 1/4 – 2 inches | Mudjacking | 2-3 hours | $675-$3,960 |
| 1/4 – 2 inches | Foam injection | 1-2 hours | 20-50% more than mudjacking |
| >2 inches | Re-setting pavers | 1-2 days | $3,000-$10,000+ |
Action Plan: Height Discrepancy Diagnostic Protocol
- Measure height difference: Use a straightedge or level to obtain a precise measurement of the displacement between the coping and deck surface.
- Evaluate displacement: If under 1/4 inch, schedule concrete grinding. If between 1/4 inch and 2 inches, an evaluation for mudjacking or foam injection is required.
- Assess structural integrity: For differences over 2 inches or if cracks and instability are visible, a full replacement of the affected section is the only safe option.
- Investigate root cause: Before any repair, you must conduct a drainage audit. Check for clogged drains, improper slope, or signs of water pooling.
- Implement corrective action: Do not proceed with leveling until the underlying drainage issue is fully resolved.
Silicone or Foam: Which Expansion Joint Material Prevents Cracking Best?
The question of silicone versus foam is a misdirection. The integrity of an expansion joint does not depend on a single material, but on the correct installation methodology. The joint’s purpose is to absorb the differential movement between the coping and the deck as they expand and contract with temperature changes. A failed joint is a primary entry point for water, which initiates the chain of failure leading to sub-base erosion and heaving. Therefore, a perfect seal is not optional; it is mandatory.
The professional standard is a ‘two-stage’ method. This is not a preference but a requirement for longevity and performance. First, a foam backer rod is inserted into the joint to a specific depth. This rod performs a critical function: it creates a void that allows the sealant applied on top to form an ‘hourglass’ shape. This shape is essential for maximizing the sealant’s flexibility and preventing adhesion failure at the edges. Supporting the caulk correctly using a backer rod is critical for proper performance, regardless of the sealant type.
The choice of sealant is then dictated by the materials being joined. For a travertine-to-concrete joint, a self-leveling polyurethane sealant is required for its superior adhesion properties. For granite-to-wood transitions, a high-flexibility, silicone-based sealant must be used to accommodate the significant difference in material movement. The expansion joint itself must have a minimum width of 1/2 inch to function correctly. Any joint narrower than this is a design flaw and must be widened.
Why is Bullnose coping safer for swimmers exiting the pool?
The profile of your pool coping is not an aesthetic choice; it is a primary safety feature. Among the available options, the bullnose profile is the mandated standard for any pool frequented by children, the elderly, or inexperienced swimmers. Its rounded, C-shaped edge is specifically engineered to function as a secure handhold, providing critical support for anyone exiting the water or treading in the deep end. A sharp, squared-off edge offers no such grip and can cause abrasions, making it an inherently riskier design.
The ergonomic superiority of the bullnose profile is not a matter of opinion. Visual inspection and physical testing demonstrate its clear advantage. The rounded surface fits the natural curve of the fingers, allowing for a firm, confident grip even when wet.
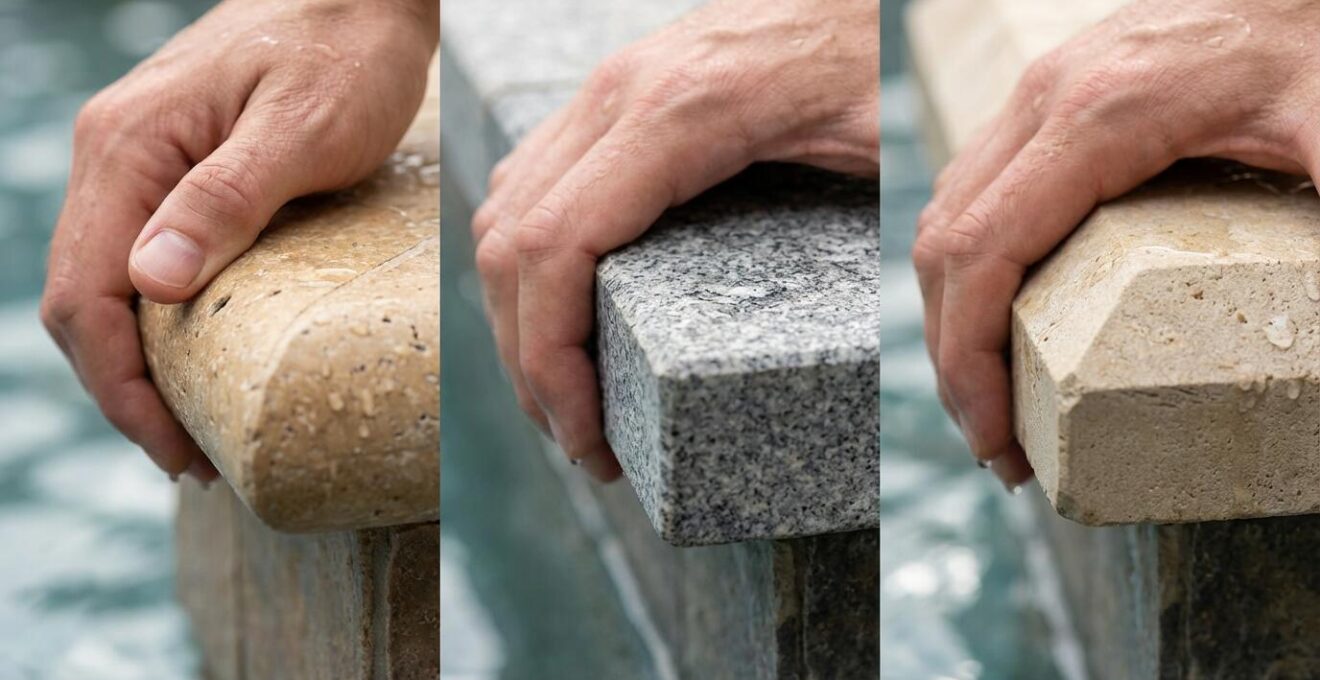
This handhold function is a major asset that safety experts prioritize. As a leading pool authority notes, the design serves a direct functional purpose beyond its appearance.
The popular ‘bullnose’ edge is rounded like the letter ‘c’. In pools with deep ends, this handhold function is a major asset: Swimmers can grip and hang from it as they tread in deeper water.
– Blue Haven Pools, What is Swimming Pool Coping? A Photo-filled Guide
Choosing any other profile over bullnose is a conscious decision to downgrade the safety of your pool environment. For any pool owner concerned with liability and the well-being of users, the specification of a bullnose coping edge is non-negotiable.
The drainage error that causes pavers to heave above the coping level
When pavers or a concrete deck begin to lift and create a trip hazard, the problem is almost never the paver or the concrete itself. The true culprit lies beneath the surface: a failure in the drainage system. Water is the primary enemy of a stable pool deck. When it is not directed away efficiently, it infiltrates the sub-base, the layer of gravel and sand beneath your deck. This water saturation erodes the compacted material, creating voids. Under the weight of the deck and the stress of freeze-thaw cycles, the slabs settle into these voids or heave upwards, destroying the zero-threshold surface.
A drainage system inspection, or “autopsy,” is therefore a mandatory first step before any leveling repair is attempted. The protocol is simple: check for clogged deck drains, verify that the deck slope is at a minimum of 1/8 inch per foot away from the pool, and ensure perimeter drains (like French drains) are clear and functional. Furthermore, all gutter downspouts must be positioned to direct roof runoff far away from the deck’s foundation. Ignoring this step is a critical error; leveling a deck with a compromised sub-base is a temporary fix doomed to fail.
The financial consequences of neglecting drainage are severe. Preventing the problem is far more cost-effective than reacting to it. An analysis of repair costs shows that mudjacking can cost between $3 to $8 per square foot, a significant expense that is entirely avoidable with proper drainage design and maintenance. This cost does not include the potential liability from an injury caused by the resulting trip hazard.
When to seal the joint between coping and deck to prevent water infiltration?
Timing is everything when it comes to sealing the expansion joint. Applying sealant is not a standalone task but a precisely timed step in a larger sequence of construction or repair. Sealing a joint prematurely or on a compromised surface is ineffective and a waste of resources. The primary rule is this: leveling must always be done before sealing. As concrete slabs are lifted during mudjacking or foam injection, they move independently. Sealing the joint first would cause the sealant to tear and fail immediately.
For new concrete installations, a mandatory curing period must be observed. Concrete releases moisture and shrinks as it cures, a process that takes time. You must wait a minimum of 28 days after new concrete is poured before any sealant is applied. Sealing before this period will result in adhesion failure as the concrete continues to change dimensionally. Furthermore, sealant application must be done under correct environmental conditions: during dry weather with ambient temperatures between 50-80°F (10-27°C).
Once sealed, the joint becomes part of a regular inspection protocol. A “Sealant Health Check” must be performed annually. This involves a visual inspection for any signs of cracking, tearing, or loss of adhesion at the edges of the sealant. A physical test, known as the ‘fingernail test’, should also be conducted: a healthy, flexible sealant will give slightly under pressure without cracking. Any sealant that is hard, brittle, or discolored from UV degradation has failed and must be completely removed and replaced.
Why Travertine Stays Cooler Than Granite on Hot Summer Days?
The surface temperature of your pool deck is a critical safety and comfort factor, especially for the sensitive feet of children and the elderly. The choice of material is not merely cosmetic; it directly dictates how hot the deck will become under the summer sun. The significant temperature difference between materials like travertine and granite is explained by a simple physical property: porosity.
Travertine and limestone are porous stones. At a microscopic level, their structure is filled with tiny voids and channels. These pores do two things. First, they trap air, which is a poor conductor of heat, acting as a natural insulator. Second, they absorb small amounts of water. On a hot day, this moisture slowly evaporates, creating a cooling effect, much like how sweat cools the skin. This process, known as evaporative cooling, is why light-colored travertine can remain comfortable to the touch even in direct sunlight.
Granite, in contrast, is an igneous rock formed under immense heat and pressure. It has a very dense, crystalline structure with extremely low porosity. It cannot absorb water or trap air effectively. As a result, it absorbs solar energy and conducts it efficiently, causing its surface temperature to rise dramatically. This high thermal mass means it not only gets hot quickly but also retains that heat for a long time, posing a burn risk long after the sun has passed its peak. Therefore, selecting a porous material like travertine is a deliberate engineering choice for a safer, more comfortable pool environment.
How to Select Hardscaping Materials That Stay Cool Under the Summer Sun?
Selecting a hardscaping material that remains cool is a scientific process, not a guessing game. The primary metric for this decision is the Solar Reflectance Index (SRI). SRI is a value from 0 to 100 that measures a material’s ability to reflect solar heat. A material with a high SRI will stay cooler in the sun, while a material with a low SRI will absorb heat and become dangerously hot. When specifying materials for a pool deck, demanding the SRI value from your supplier is a mandatory step in the safety audit.
Color is the most obvious factor influencing SRI; lighter colors reflect more sunlight and have higher SRI values. However, material composition is equally important. The table below compares common pool deck materials and their general performance regarding heat retention. This data must be used as a primary filter in your selection process.
| Material | Heat Retention | SRI Value | Comfort Level |
|---|---|---|---|
| Light Travertine | Low | High | Cool to touch |
| Concrete Pavers | Medium | Medium | Moderate heat |
| Dark Slate | High | Low | Very hot |
| Granite | High | Low-Medium | Hot in sun |
Beyond SRI, other factors contribute to a safe surface. Textured materials, while potentially retaining slightly more heat than a smooth polished surface of the same material, offer superior slip resistance when wet, a critical trade-off. If replacing an existing dark, hot deck is not feasible, specialized ‘cool deck’ coatings can be applied. These coatings contain reflective pigments that increase the surface’s SRI, providing a practical retrofitting solution to mitigate burn risks.
Key Takeaways
- The Solar Reflectance Index (SRI) is the most critical metric for choosing a cool deck material.
- Light-colored, porous materials like travertine consistently outperform dense, dark materials like granite and slate in heat resistance.
- Safety requires a balance between heat reflection (SRI) and slip resistance (texture).
How to Choose Mosaic Tiles That Won’t Pop Off After Three Winters?
The phenomenon of mosaic tiles “popping off” a pool’s surface after a few seasons is not bad luck; it is a predictable failure of material specification. This failure is almost always caused by one of two factors: water infiltration followed by a freeze-thaw cycle, or a mismatch in the thermal expansion rates of the tile and the underlying structure. Both are preventable with a strict adherence to material standards.
The single most important specification for any tile used in a pool, especially in climates with freezing temperatures, is its water absorption rate. Water is the agent of destruction. If a tile absorbs water and the temperature drops below freezing, that water expands into ice, exerting immense internal pressure that will delaminate, or “pop,” the tile off its setting bed. To be rated as “frost-proof,” a tile must be vitreous or impervious. According to industry standards, frost-proof porcelain or glass tiles must have a water absorption rate of less than 0.5%. Verifying this specification before purchase is non-negotiable.
The second cause is differential movement. Materials like glass tile expand and contract at a different rate than the cement-based thinset and grout used to install them. Over many cycles of heating and cooling, this mismatch creates stress at the bond line, leading to micro-cracks. Water enters these cracks, the grout deteriorates, and the failure accelerates. This is why using a high-performance, polymer-modified thinset and grout system designed specifically for submerged, high-stress environments is a requirement, not an upgrade.
Ensuring the long-term safety and integrity of your pool area is an ongoing responsibility. It requires a systemic approach that moves beyond reactive repairs to a proactive culture of inspection and adherence to non-negotiable standards. By treating your pool deck as an integrated safety system, you can eliminate hazards before they manifest. For a comprehensive review of your own pool’s safety profile, the next logical step is to conduct a full diagnostic audit.