Building a pool on clay soil that lasts for decades is not about luck or excessive spending; it’s about precise, proactive engineering that prevents catastrophic, high-cost failures.
- A geotechnical soil study is the single most critical, non-negotiable investment to define the project’s structural requirements.
- The pool’s reinforcement, shell material, and drainage system must be designed as one interconnected structural system to manage soil forces.
- Proper backfilling and water balancing during construction are not just finishing steps; they are fundamental to preventing immediate and long-term wall failure.
Recommendation: Prioritize your budget on upfront engineering expertise and structural components over aesthetic features to guarantee the long-term viability and safety of your entire investment.
The dream of a backyard pool can quickly turn into a nightmare of spiraling repair costs when building on expansive clay soil. Landowners often watch with anxiety as hairline cracks appear, fearing they are the first signs of a catastrophic structural failure. The common advice—to ensure good drainage or simply “hire a good builder”—is dangerously insufficient. These platitudes fail to address the fundamental engineering challenge: clay soil is not a stable building medium. It swells when wet and shrinks when dry, exerting immense and unpredictable forces on any structure embedded within it.
This isn’t a simple landscaping project; it’s a matter of civil engineering. Treating your pool as a static “tub in the ground” is the root cause of most failures. The real key to longevity without breaking the bank is to adopt an engineering-first mindset. This means understanding the specific properties of your soil, designing a structural system that can actively respond to ground movement, and enforcing rigorous construction protocols. The money you invest in analysis and structural design upfront is not an expense; it is insurance against the six-figure cost of a collapsed shell or a deck ripped apart by soil heave.
This guide moves beyond generic advice to provide an engineer’s perspective on building a durable pool on challenging soil. We will dissect the critical decision points, from the non-negotiable geotechnical study to the specific calculations for reinforcement and the technical reasons behind choosing one shell type over another. By understanding these principles, you can ensure your pool is an enduring asset, not a costly liability.
Summary: A Civil Engineer’s Blueprint for a Pool on Expansive Soil
- Why skipping the geotechnical study puts your entire $50k project at risk?
- How to calculate rebar density for pools built on expansive soil?
- Concrete or Fiberglass: Which Shell Better Resists Ground Movement in Frost Zones?
- The hairline crack myth that causes owners to ignore serious structural damage
- When to backfill a new pool shell to prevent wall collapse during construction?
- How to Build a Pool on a 20% Slope Without Risking a Landslide?
- Why Shotcrete is the Only Viable Option for Complex Free-Form Pool Designs?
- How to Fix Soil Subsidence Around Your Pool Deck Before Pipes Break?
Why skipping the geotechnical study puts your entire $50k project at risk?
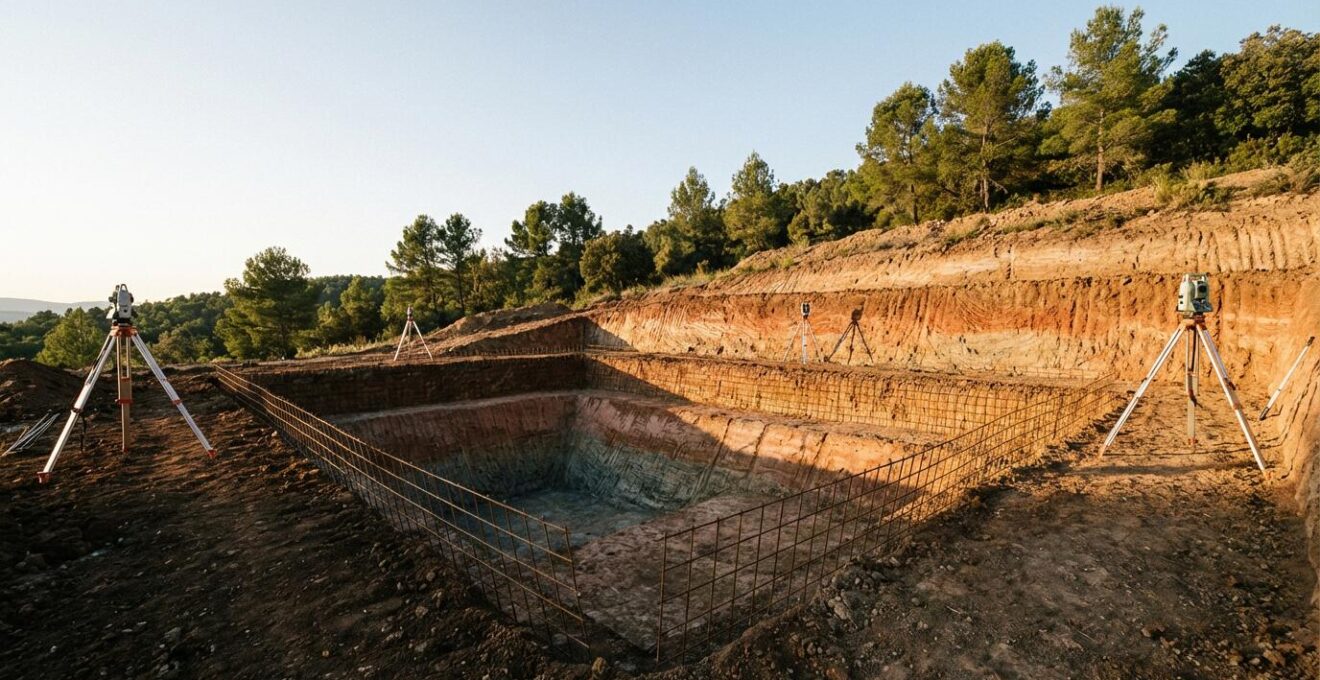
Viewing a geotechnical study as an optional expense is the single most dangerous financial decision a homeowner can make when building on clay. It’s equivalent to building a house without inspecting the foundation. The entire structural design of the pool—from shell thickness to rebar specification and drainage requirements—is dependent on the data contained in this report. Without it, your builder is operating blind, using generic assumptions that are almost certainly wrong for your specific site. This gamble exposes your entire investment to failure from forces that could have been easily predicted and managed.
The economics are starkly clear. While a professional geotechnical survey costs between $1,000 and $5,000, the cost of repairing a failed pool structure can easily exceed $50,000, often requiring complete demolition and replacement. A geotechnical engineer will perform soil borings to determine critical parameters like the Plasticity Index (PI), which measures the soil’s potential to swell and shrink. This data allows the structural engineer to design a pool that can withstand the specific forces at play on your property, rather than a one-size-fits-all solution destined to fail.
Consider the logic from a commercial development perspective, where such risks are never taken. A developer who invested $30,000 in a comprehensive geotechnical study for a larger project successfully avoided over $1,000,000 in potential foundation failure repairs. The study identified highly expansive clay that mandated a specialized foundation design. For a residential pool, the principle is identical, just scaled down. That modest upfront investment is what separates a successful 30-year pool from one that cracks within the first five years.
How to calculate rebar density for pools built on expansive soil?
On stable ground, the steel rebar in a concrete pool primarily handles tensile forces from water weight. On expansive soil, its role becomes far more complex and critical. The rebar cage must now function as a monolithic structural skeleton, resisting forces from both hydrostatic pressure pushing outwards and soil pressure pushing inwards and upwards. Calculating the correct rebar density is therefore not a matter of following a generic building code; it must be a direct response to the “active” nature of the soil, as defined by the geotechnical report.
Expansive soils are powerful. Certain highly expansive soil types can undergo a 30 percent volume change between their wettest and driest states. This movement exerts incredible, non-uniform pressure on the pool shell. To counteract this, the rebar grid must be denser and often larger in diameter. Standard practice might call for #3 bars at 12-inch centers, but on highly expansive soil, an engineer might specify #4 bars at 8-inch centers, effectively creating a much more robust and integrated structural cage. The design must also include additional vertical and horizontal bars at high-stress points, such as corners and where steps or benches meet the main shell.
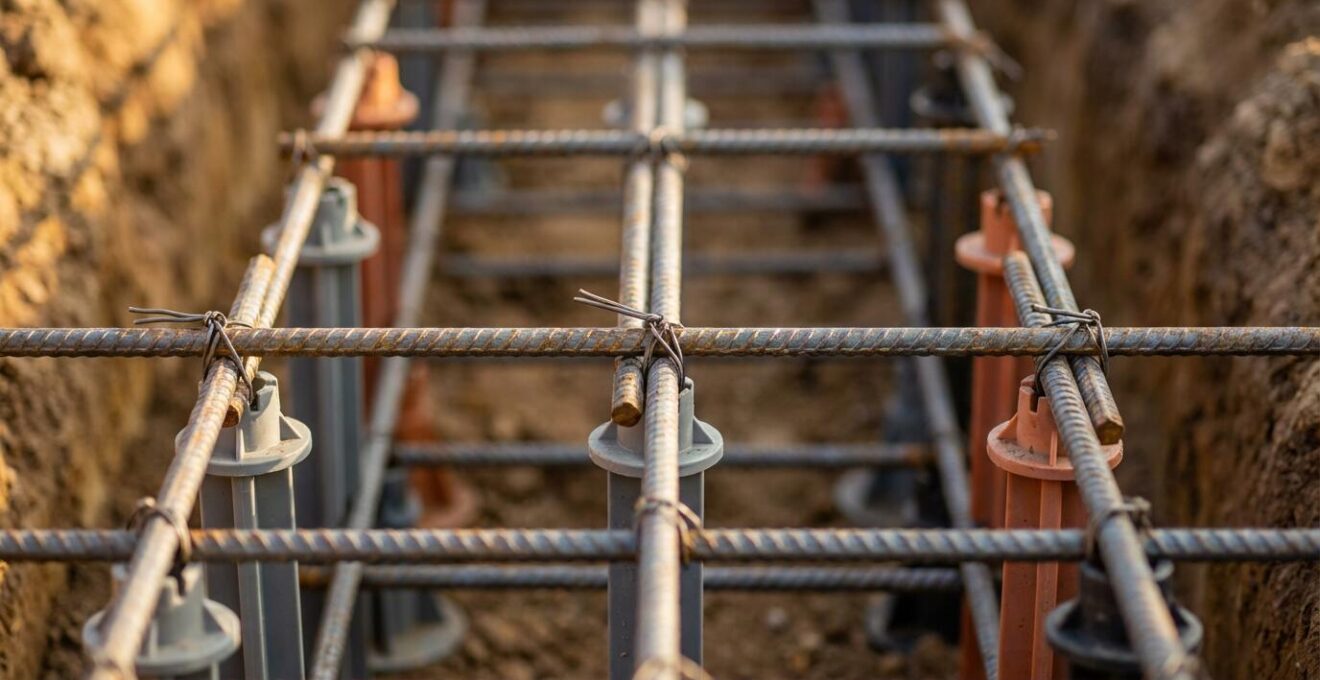
The image above demonstrates the meticulous nature of a properly constructed rebar cage. Notice the uniform spacing and the use of “chairs” to elevate the cage, ensuring it will be perfectly centered within the concrete shell. This precise placement is as important as the density. If the rebar is too close to the surface, it can be prone to corrosion; if it’s too deep, it fails to provide adequate tensile strength against surface cracking. The goal is to create a monolithic structure where the steel and concrete work in unison to distribute soil-induced loads across the entire shell, preventing localized stress points that lead to fractures.
Concrete or Fiberglass: Which Shell Better Resists Ground Movement in Frost Zones?
The choice between a concrete (shotcrete or gunite) and a fiberglass shell on expansive soil, especially in regions with frost heave, is a critical engineering trade-off. There is no single “best” answer; rather, each material requires a different engineering approach to manage ground movement. A concrete pool is an inherently rigid structure. Its strength lies in its mass and the integrity of its rebar cage. A fiberglass pool, conversely, is designed to have a degree of flexibility, allowing it to move with the soil to a certain extent.
As industry expert Cohen notes in PoolPro Magazine, building on expansive clay “is like building on top of a sponge.” This analogy perfectly captures the challenge. A rigid concrete shell sitting on this “sponge” is vulnerable to cracking if a single point of pressure from frost heave exceeds its structural limit. Its survival depends on the shell being engineered to be so strong that it can bridge over areas of soil movement. In contrast, a fiberglass shell’s survival depends on the quality of its foundation and backfill. The shell itself is just one part of a system; the engineered gravel backfill that encases it is what provides the primary support and allows groundwater to drain away, mitigating pressure.
This comparative table breaks down the fundamental differences in how each pool type interacts with active soil conditions.
| Factor | Concrete Pool | Fiberglass Pool |
|---|---|---|
| Flexibility | Rigid structure, no flex | Natural flex strength adapts to soil movement |
| Primary Support | Shell structure itself | Surrounding backfill cradle |
| Frost Heave Risk | Cracking under pinpoint pressure | Buckling if drainage fails |
| Critical Engineering Focus | Shell reinforcement | Backfill selection and compaction |
| Installation Cost | Higher upfront shell cost | Lower shell, higher drainage system cost |
Ultimately, a well-engineered concrete pool and a properly installed fiberglass pool can both succeed in frost zones with clay. The decision hinges on understanding where the critical engineering focus must be placed. For concrete, it’s the shell reinforcement. For fiberglass, it’s the backfill and drainage system. Ignoring either is a recipe for failure.
The hairline crack myth that causes owners to ignore serious structural damage
One of the most dangerous myths in pool ownership is that “all concrete pools get hairline cracks.” While minor surface crazing can be cosmetic, dismissing any crack without proper diagnosis is a high-stakes gamble on expansive soil. A crack is a symptom, and on active soil, it often points to a serious underlying disease: structural stress. What appears to be a “hairline” crack could be the initial fissure from soil heave or settlement that will inevitably widen, leading to leaks, rebar corrosion, and eventual structural failure.
The location and direction of a crack are critical diagnostic indicators. A horizontal crack midway up the pool wall often signals immense pressure from surrounding soil. Vertical cracks can indicate settlement. Cracks at the intersection of the pool floor and walls, or where features like a Baja shelf connect, are particularly alarming as these are high-stress points. A case study of Baja shelf failures in multiple California pools illustrates this perfectly. The shelves, lacking proper independent reinforcement, cracked and heaved up to two inches out of level when the underlying clay became saturated. The “minor” cracks were the first and only warning of a complete structural design flaw.
Ignoring a crack is not a solution. A systematic assessment is required to determine if it is cosmetic or structural. This is not a task for an amateur. However, a homeowner can perform an initial triage to decide if an immediate call to a structural engineer is warranted.
Your Action Plan: Crack Assessment and Monitoring Protocol
- Measure and Record: Use a crack gauge or a precise ruler to measure the crack’s width. Any crack wider than 1/4 inch (6mm) is a red flag that requires immediate professional assessment. Document its exact location with photos.
- Identify Critical Zones: Pay special attention to cracks located at corners, where the tile line (bond beam) meets the shell, and at the junction of any steps, benches, or shelves. These are structural weak points.
- Analyze Direction: Note the crack’s orientation. As a general rule, horizontal cracks suggest external soil pressure, while vertical cracks can point to settlement issues. Diagonal cracks often indicate a combination of forces.
- Monitor for Activity: For smaller cracks, install an inexpensive crack monitor (epoxy-mounted tabs) across the fissure. Check it over 4-6 weeks. If the monitor shows the crack is actively growing in width or length, it is a sign of ongoing structural stress.
- Perform a Dye Test: To check for leaks, turn off the pump and allow the water to become still. Carefully release a small amount of pool-safe dye near the crack. If the dye is drawn into the crack, you have confirmed an active leak that will compromise the structure over time.
When to backfill a new pool shell to prevent wall collapse during construction?
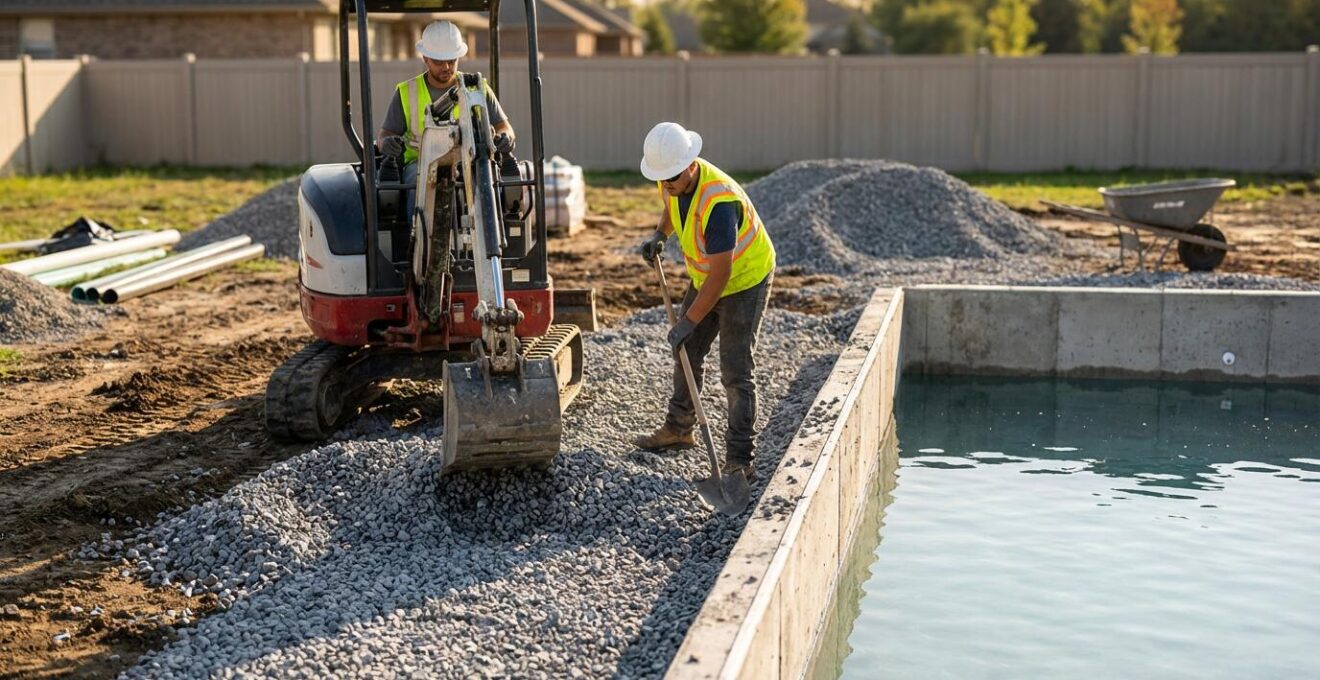
The backfilling stage of pool construction is a moment of extreme vulnerability, especially for fiberglass or steel-walled vinyl liner pools on clay soil. The empty shell is relatively weak and is designed to be supported by the equalized pressure of water on the inside and backfill on the outside. Backfilling incorrectly—either too soon, with the wrong material, or without balancing water levels—can cause walls to bow, bulge, or even collapse entirely. This critical step must be treated with engineering precision, not as a simple task of “filling in the dirt.”
The primary rule is synchronized balancing. As the backfill material is added around the outside of the pool, water must be added inside the pool at the same rate. The goal is to keep the water level and the backfill level within 12 inches of each other at all times. This equalizes the pressure and ensures the shell is not subjected to a massive one-sided load. Furthermore, the material used for backfill is paramount. Using the excavated clay soil is a common, and catastrophic, mistake. Clay holds water, freezes, expands, and does not compact properly. The correct material is typically clean, angular gravel, which allows for proper compaction in “lifts” (layers of 8-12 inches) and provides excellent drainage, preventing water from accumulating against the pool walls.
Violating these protocols has immediate consequences. There are countless field reports of pool builders using excavated clay mixed with rocks and debris as backfill, dumping it all at once against an empty shell. This practice directly contradicts all manufacturer engineering specifications and introduces massive point loads and voids, creating a ticking time bomb for future settlement and wall failure. The soil’s properties, particularly a Plasticity Index above 30 which is considered high risk, make adherence to these protocols even more critical. The short-term cost savings of using native soil for backfill are dwarfed by the long-term cost of structural failure.
How to Build a Pool on a 20% Slope Without Risking a Landslide?
Constructing a pool on a significant slope, especially with expansive clay soil, fundamentally changes the nature of the project. As one industry expert succinctly put it, “It’s a Retaining Wall Project, Not a Pool Project.” The primary engineering challenge is no longer just the pool shell itself, but creating a stable, level platform that can support the pool’s immense weight (a typical pool can weigh over 150,000 lbs) while resisting the downslope gravitational forces and the soil’s tendency to slide and creep.
On a 20% slope (a 2-foot drop for every 10 feet of horizontal distance), a simple cut-and-fill approach is exceptionally risky. The fill side is prone to settlement and erosion, while the cut side creates an unstable, over-steepened slope. The professional solution involves creating a foundation that bypasses the unstable surface soils entirely. This is often achieved with deep foundation elements like caissons or helical piles. These are steel shafts that are drilled or screwed deep into the ground until they reach a stable, load-bearing soil layer or bedrock, far below the active zone of the expansive clay.
Case Study: Helical Pile Foundation for a Pool on Expansive Clay
A Texas homeowner faced the dual challenge of a sloped yard and highly expansive clay. The engineering solution involved installing a system of 25 CHANCE helical piles around the planned pool perimeter. These piles were driven 18-22 feet deep to anchor into stable soil, well below the zone of seasonal moisture change. The tops of the piles were then integrated directly into the pool’s rebar cage, creating a unified foundation. This system provides robust support against both downward compression (the weight of the pool) and upward tension from soil heave. The entire deep foundation system was installed in just 1.5 days, demonstrating its efficiency for sites with limited access.
The pool shell is then built on top of this network of piles, effectively floating above the problematic, shifting clay. The retaining walls required to level the site are not just decorative; they are massive structural elements, often with their own deep foundations, designed to hold back thousands of tons of earth. This approach is a significant investment, but it is the only way to mitigate the immense risk of a landslide or catastrophic structural failure on a sloped, active-soil site.
Why Shotcrete is the Only Viable Option for Complex Free-Form Pool Designs?
When the pool design moves beyond simple geometric shapes into complex, free-form curves, lagoons, and integrated rock features, shotcrete becomes the only structurally viable construction method. Unlike pre-fabricated fiberglass shells or the panel-based construction of vinyl liner pools, shotcrete is a process, not a product. It involves pneumatically applying concrete at high velocity onto a dense cage of custom-bent rebar. This method allows for the creation of a monolithic, one-piece structure of virtually any shape imaginable, with no seams or joints to become weak points.
The structural advantage is immense, particularly on expansive soil. A free-form design has numerous complex curves and transitions, which are all potential stress concentration points. With shotcrete, the rebar cage is fabricated as a single, continuous piece, and the concrete is applied to fully encapsulate it, creating a seamless vessel where loads are distributed evenly across the entire structure. This monolithic nature is far superior to trying to bolt together panels or fit a pre-made shape into a complex excavation, both of which would create inherent weaknesses right where the stresses from expansive soil are likely to be highest.
However, the success of a shotcrete pool is entirely dependent on the skill of the application crew, especially the nozzleman. This is not a task for a general concrete crew. Vetting a qualified shotcrete contractor is essential and should involve verifying their credentials and experience. Key points to verify include:
- ACI Certification: The nozzleman must hold a current certification from the American Concrete Institute (ACI), which proves they have been tested on proper application techniques.
- Pool-Specific Experience: Ask for a portfolio of free-form pools they have constructed, not just retaining walls or channel lining. Inspect their past work in person if possible.
- Proper Crew and Mix: A professional crew consists of at least four members. They should be using a wet-mix shotcrete process, which ensures a consistent, factory-controlled mix strength, far superior to dry-mix methods done on-site.
Key Takeaways
- Building on clay soil is an engineering challenge; a geotechnical study is a non-negotiable investment to prevent catastrophic failure.
- The pool’s structural system (shell, rebar, backfill, drainage) must be designed holistically to manage the specific forces of your site.
- Dismissing “minor” cracks or cutting corners on construction protocols like backfilling are the most common paths to six-figure repair bills.
How to Fix Soil Subsidence Around Your Pool Deck Before Pipes Break?
Soil subsidence around a pool deck is a common and alarming issue on properties with expansive clay. It often manifests as voids under the concrete deck, settled or cracked slabs, and coping that is separating from the pool shell. This is not merely a cosmetic problem; it is a direct threat to your pool’s plumbing. As the soil and deck sink, they can exert immense shear force on the rigid PVC pipes that run from the pool to the equipment pad, causing them to crack or snap, leading to major underground leaks.
The root cause is often poor water management. When the clay soil used as a base for the deck becomes saturated from rain or over-splash, it expands. During a dry spell, it shrinks dramatically, causing the ground to subside and taking the deck with it. The first line of defense is always preventative: ensuring proper site grading so that all surface water flows away from the pool, and extending gutter downspouts to discharge well away from the deck area. As expert Neil Cohen emphasizes, “The pool coping has to be completely separated from the pool deck with an isolation joint down the full depth of the slab.” This creates a crucial buffer, allowing the deck to move independently without transferring stress to the pool shell.
When subsidence has already occurred, there are several tiers of repair, ranging from low-cost intervention to complete replacement. The appropriate solution depends on the severity of the settlement.
| Solution Level | Method | Cost Range | Effectiveness |
|---|---|---|---|
| Low-Cost Prevention | Correct grading, extend downspouts | $200-$500 | Prevents future issues |
| Mid-Cost Repair | Polyurethane foam injection | $300-$900 per hole | Lifts settled slabs |
| High-Cost Solution | Demolition and replacement | $10-$25 per linear foot | Complete structural fix |
| Preventative | Pipe sleeving system | $50-$100 | Prevents pipe shearing |
For moderate settlement, polyurethane foam injection (poly-jacking) is a highly effective solution. A contractor drills small holes in the sunken slab and injects a two-part structural foam that expands, filling the void and lifting the slab back into place. This method is far less intrusive and costly than demolition and also helps stabilize the underlying soil. Addressing subsidence promptly not only restores the deck’s appearance and safety but is critical to protecting the hidden plumbing infrastructure from destructive shear forces.
The longevity of a pool in expansive soil is determined before the first shovel hits the ground. It is a function of diligent analysis, robust engineering, and disciplined construction, not chance. By shifting your focus from aesthetics to structure and investing in the unseen components—the soil report, the rebar density, the deep foundations, the engineered backfill—you are not just building a pool. You are constructing a lasting piece of infrastructure. For the most secure outcome, engage a qualified geotechnical engineer and a structural engineer early in your planning process to design a solution tailored specifically to the forces at play on your property.