A sinking pool deck is not a cosmetic issue; it’s a critical symptom of underground failure that can lead to broken pipes and escalating repair costs.
- Soil settlement is often caused by a “compaction debt” left by the original installer, which water erosion activates over time.
- Modern polyurethane foam injection not only lifts sunken slabs but also stabilizes the weak soil beneath, addressing the root cause more effectively than traditional mudjacking.
Recommendation: Immediately assess the severity using the signs in this guide. Minor gaps may be a DIY fix, but widening cracks or uneven water lines require urgent professional evaluation to prevent catastrophic failure.
That sinking feeling you get when you see your pool deck cracking and dropping is more than just an aesthetic concern—it’s a warning. As a foundation repair specialist, I see homeowners make the same mistake: they treat the symptom, patching the crack or ignoring the uneven slab. They don’t realize they’re standing on a ticking clock. The soil beneath your beautiful deck is in a state of failure, and the ultimate price isn’t a new slab of concrete, but a shattered pool pipe and a flooded, unstable backyard.
Most advice focuses on generic causes like “poor drainage” or “soil settlement.” While true, this is dangerously simplistic. It doesn’t explain why a deck that seemed fine for years suddenly starts to fail. The real issue is often a “compaction debt”—an invisible flaw from the day of installation that water and time have come to collect. This isn’t just about lifting the concrete; it’s about winning a subsurface war against erosion and hydrostatic pressure before it compromises your entire pool structure.
This guide changes the approach. We will move beyond surface-level fixes. We will treat you, the homeowner, as the first responder at the scene of a structural emergency. You will learn to perform structural triage, to read the subtle signs of critical failure, to understand the forces actively working to destroy your investment, and to choose a repair method that solves the problem at its source. Forget patching the cracks; it’s time to stabilize the foundation.
To provide a clear path from diagnosis to action, this guide is structured to help you understand the core issues, evaluate solutions, and identify critical warning signs. The following sections will walk you through each crucial step.
Summary: A Homeowner’s Diagnostic Manual for Pool Deck Subsidence
- Why is your pool deck sinking on one side despite proper compaction?
- How to install a French drain system to stop erosion under the pool shell?
- Mudjacking vs Polyurethane Foam: Which Method Lifts Pool Decks Best?
- The compaction error contractors make that causes subsidence after 2 years
- When to call a structural engineer: 3 signs your soil issues are critical
- How to Cultivate a Lush Garden That Survives Pool Splash and Humidity?
- How to Select Hardscaping Materials That Stay Cool Under the Summer Sun?
- How to Eliminate Trip Hazards Between the Coping and Decking?
Why is your pool deck sinking on one side despite proper compaction?
The claim that your pool was built on “properly compacted” soil is often the first illusion to shatter. True compaction is a science, but it’s frequently rushed during construction. The result is what I call a “compaction debt.” The soil looks stable initially, but it contains hidden voids and inconsistencies. Over time, the combined weight of the concrete deck, water intrusion, and natural soil settling causes these voids to collapse. This process is rarely uniform, which is why your deck sinks on one side, creating dangerous trip hazards and immense stress on your pool’s plumbing.
This settlement isn’t a minor issue; it’s a primary failure mode for concrete structures. In fact, industry analysis confirms that pool decks are one of the most common concrete structures to settle, primarily due to this initial compaction failure. The backfill soil around the pool shell is the weakest link. As this loose soil inevitably settles, it pulls the overlying concrete slabs down with it, creating a domino effect of structural instability that puts your entire investment at risk.
Think of the soil under your deck not as a solid rock, but as a dense sponge. When water is introduced from rain, sprinklers, or pool splash, it saturates this sponge. As it drains away or is drawn out by nearby plants, it carries fine soil particles with it, a process called erosion. This slowly but surely expands the voids within the compaction debt, accelerating the sinking process. What you see as a slowly widening crack is actually the final, visible evidence of this long-term subsurface collapse.
How to install a French drain system to stop erosion under the pool shell?
If poor compaction is the “compaction debt,” then uncontrolled water is the force that cashes it in. To stop your pool deck from sinking further, you must win the subsurface water warfare by controlling moisture around your pool’s foundation. The single most effective weapon in this fight is a properly installed French drain system. This isn’t just a ditch filled with rocks; it’s an engineered system designed to intercept, collect, and redirect groundwater before it has a chance to erode the soil supporting your deck and pool shell.
A French drain creates a path of least resistance for water. Instead of saturating the weak backfill soil around your pool, water flows into the gravel-filled trench, enters a perforated pipe, and is safely channeled away to a suitable discharge point. This dramatically reduces hydrostatic pressure—the force of water pushing against your pool walls and under your deck—which is a primary driver of both erosion and structural shifting. Installing one is a proactive measure to halt ongoing damage and prevent future settlement.
The illustration below shows a cross-section of a correctly installed French drain, highlighting the critical layers that ensure its effectiveness.
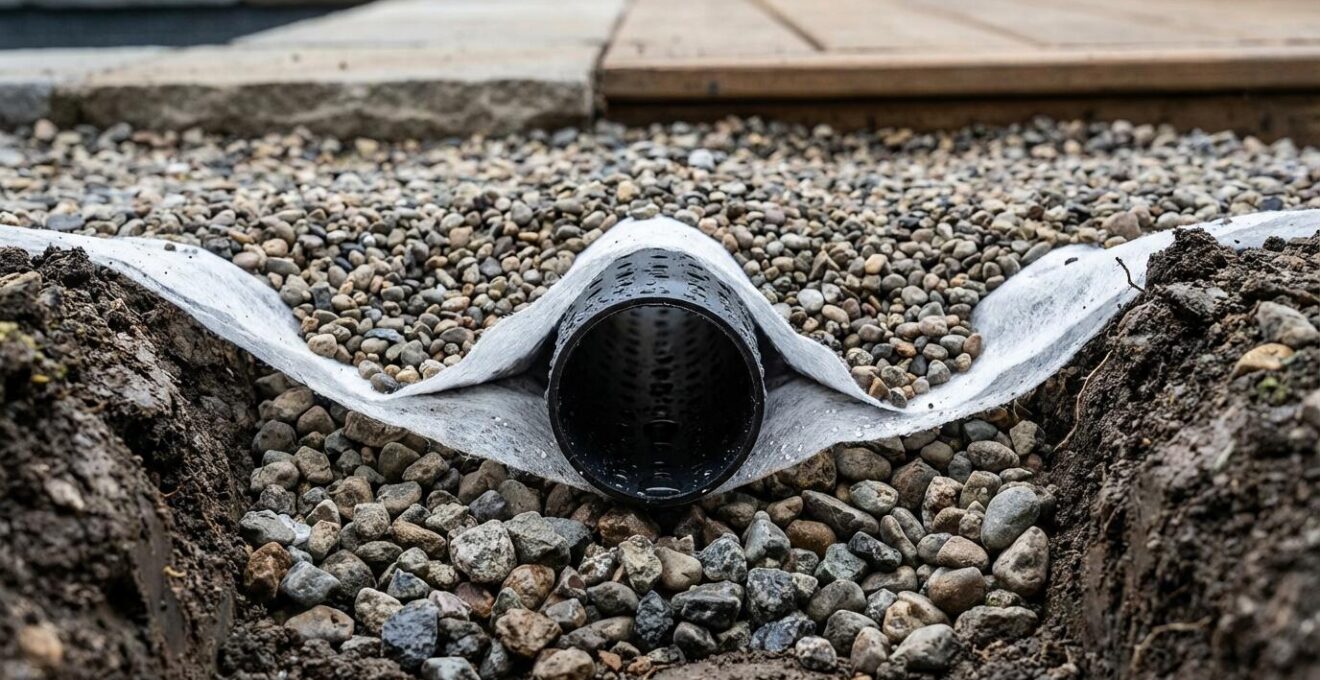
Implementing this system requires precision. It’s not a task to be taken lightly, as an improperly installed drain can worsen the problem. The goal is to create a reliable channel that intercepts water at the source of the problem—the edge of the pool deck. Here are the fundamental steps professional installers follow:
- Excavate a trench, typically 6-12 inches wide, ensuring it is deeper than the base of the concrete deck.
- Line the trench with a non-woven geotextile fabric to prevent soil from clogging the gravel.
- Add a base layer of several inches of washed, angular gravel.
- Lay a perforated pipe (SDR or corrugated) with the perforation holes facing down to collect water.
- Maintain a continuous downward slope of 1% to 2% in the pipe to ensure gravity-fed drainage to the discharge point.
- Backfill the trench with more gravel, then fold the geotextile fabric over the top before adding a final decorative layer of rock or soil.
Mudjacking vs Polyurethane Foam: Which Method Lifts Pool Decks Best?
When your deck has already sunk, drainage alone isn’t enough; you need to lift the slab and stabilize the failed soil beneath it. The two primary methods for this are traditional mudjacking and modern polyurethane foam injection. Choosing between them is not just about cost—it’s about deciding whether you want to simply prop up the symptom or cure the underlying disease. My professional experience has shown that one method is decisively superior for the unique challenges of a poolside environment.
Mudjacking involves pumping a heavy slurry of mud, cement, and sand under the slab to force it back up. While it’s often the cheapest option, it introduces a significant problem: it adds hundreds or even thousands of pounds of weight onto soil that has already proven it cannot support the existing load. It’s like putting a heavy patch on a failing tire. Furthermore, it requires larger injection holes and has a longer cure time before the deck is usable again.
Polyurethane foam injection, by contrast, is a more surgical approach. A lightweight, high-density, structural-grade polymer is injected as a liquid through small, penny-sized holes. Within seconds, it undergoes a chemical reaction, expanding to fill every void and fissure in the soil. This expansion exerts a powerful, controlled force that lifts the concrete slab back to its original position. Crucially, the foam cures into a rigid, waterproof, and incredibly lightweight solid in about 15 minutes. It not only lifts the deck but also consolidates and stabilizes the weak soil beneath it, effectively creating a new, solid foundation without adding any significant weight. This dual action of lifting and stabilizing is what makes it the superior long-term solution. While the initial cost is higher than mudjacking, it is significantly more affordable than a full replacement, with some reports showing it can be 50% less than the cost of replacement.
The following table provides a clear comparison of the methods, based on industry data from foundation repair specialists.
| Method | Cost | Injection Holes | Weight Impact | Cure Time |
|---|---|---|---|---|
| Mudjacking | Cheapest option | 1/4″ larger holes, twice as many sites | Adds weight to compromised subsoil | Longer cure time |
| Polyurethane Foam | Higher initial cost | Penny-sized holes | Lightweight material | 15 minutes curing time |
| Concrete Replacement | Most expensive | Complete demolition | Full weight replacement | Several days |
The compaction error contractors make that causes subsidence after 2 years
The “compaction debt” that leads to your sinking pool deck originates from a single, critical error made during construction: using the wrong backfill material and failing to compact it in proper layers. Many contractors, seeking to save time and money, will backfill the area around the newly installed pool shell with the same native soil or sand that was excavated. This is the original sin of pool construction, and it’s a structural time bomb.
This is where the failure begins. The visual below contrasts the correct method of thin-layer compaction with the flawed, thick-layer approach that inevitably leads to settlement.
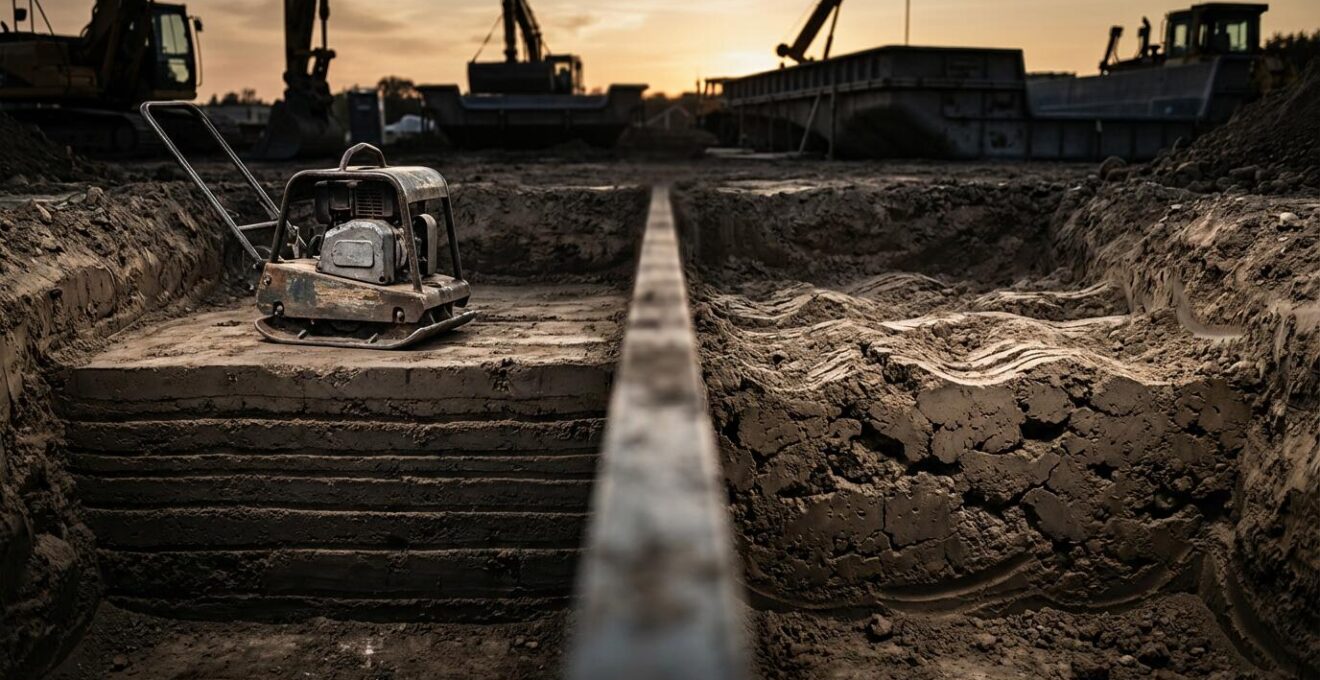
Native soil and sand are notoriously difficult to compact effectively. They are prone to settlement and highly susceptible to erosion. Professional engineering standards call for the use of crushed angular rock as backfill. Unlike rounded sand particles or clumpy soil, the sharp, interlocking edges of crushed rock allow for vastly superior compaction. This creates a stable, load-bearing base that is also permeable, allowing water to drain through rather than build up pressure.
The difference in stability is not theoretical; it’s quantifiable. According to geotechnical analysis, the choice of material has a dramatic impact on stability. A study highlighted by pool construction experts shows that crushed rock can attain compaction rates of 90-95% of its maximum density. In stark contrast, sand and dirt often achieve only 60%-70% compaction. That 30% difference is the “compaction debt”—a massive volume of hidden voids just waiting for time and water to cause a collapse. When your deck starts sinking two, five, or even ten years after installation, it’s this debt finally coming due.
When to call a structural engineer: 3 signs your soil issues are critical
As a homeowner, your first job is structural triage. You need to quickly and accurately assess the severity of the situation to decide between a simple DIY repair and an urgent call to a professional. Ignoring critical warning signs is the fastest way to turn a thousand-dollar deck repair into a twenty-thousand-dollar pool and plumbing catastrophe. Some issues can be monitored, but the following signs indicate that the underlying soil failure is advanced and poses an immediate threat to your pool’s integrity. If you observe any of these, the time for watching and waiting is over.
These are not cosmetic flaws; they are direct indicators of differential settlement, meaning parts of your pool are moving at different rates. This puts unimaginable stress on the rigid pool shell and its plumbing connections. A grout crack might seem small, but it can be the first surface expression of a massive underground void that is about to cause a pipe to shear off. Do not underestimate these signs.
You must conduct a thorough inspection of your pool area immediately. This is not a casual glance; this is a detailed audit. Use the following checklist to identify red flags that demand professional intervention. Finding even one of these signs means you should contact a geotechnical or structural engineer without delay.
Your Critical Subsidence Audit: 5 Triage Steps
- Check the Water Line: Look closely at the water level against the tile line inside the pool. Is it perfectly level all the way around? A visibly tilted water line is an undeniable sign the entire pool shell is moving.
- Inspect the Tile Grout: Examine the grout lines in your pool’s tile, especially at the corners and around steps. Look for “step-fractures”—cracks that are wider on one end than the other or where one side is higher than the other.
- Measure the Expansion Joint: Observe the expansion joint between the pool coping (the edge) and the main deck. Is it compressing tightly in one spot while widening significantly in another? This indicates severe differential movement.
- Document the Timeline: When did you first notice the sinking? Has it accelerated? A professional will need this information to diagnose the rate of failure. Be prepared to answer these questions.
- Take Immediate Action: If you’ve confirmed one or more of these critical signs, stop all DIY considerations. Your next and only step is to hire a professional geologist, civil engineer, or structural engineer to investigate what is now a potentially dangerous situation.
How to Cultivate a Lush Garden That Survives Pool Splash and Humidity?
Your landscaping choices are not just about aesthetics; they are an active part of your pool’s structural ecosystem. The wrong plants can accelerate soil subsidence, while the right ones can help stabilize it. The area around a pool is a challenging microclimate—subject to chlorine or saltwater splash, intense reflected heat, and high humidity. Choosing plants that thrive in these conditions while also supporting soil stability is a crucial, yet often overlooked, part of preventing future deck problems.
The primary threat from landscaping comes from below ground. Plants with large, aggressive, water-seeking root systems are a major liability near a pool. Trees like Willows and Silver Maples will actively seek out and break underground plumbing in their search for water. Furthermore, their extensive root systems can cause significant soil subsidence by drawing huge amounts of moisture out of clay soils, causing them to shrink, crack, and settle. You must avoid these species at all costs.
Instead, focus on two categories of beneficial plants. First, select plants with non-invasive, fibrous root systems that help bind the topsoil and prevent surface erosion from splash and rain. These groundcovers act like a living net, holding the soil in place. Second, consider incorporating a “bioswale”—a landscaped drainage channel filled with water-loving plants. These features not only look beautiful but also act as a natural, active part of your drainage system, absorbing excess moisture and reducing the load on your French drains. Choose hardy, splash-tolerant species like ornamental grasses, daylilies, or succulents that are adapted to challenging coastal or dry conditions.
How to Select Hardscaping Materials That Stay Cool Under the Summer Sun?
The material you choose for your pool deck and surrounding hardscaping has a direct impact on both safety and structural stability. While keeping the surface cool enough for bare feet is a common concern, the material’s interaction with water and temperature fluctuations is far more critical from a structural standpoint. Your hardscaping is the first line of defense against water infiltration, and its properties can either help or hinder the fight against subsidence.
Materials like poured concrete or tightly fitted stone are impermeable. Any water that lands on them must run off, and if the deck is not perfectly sloped, that water will find its way into the weakest point: the expansion joint between the deck and the coping. This joint is the gateway to the vulnerable backfill soil beneath. Over time, constant water intrusion here will guarantee erosion and settlement. This is especially true as recent global subsidence research shows ground sinking is a widespread and serious issue, making water management paramount.
A structurally superior choice is to use permeable pavers. These pavers are designed with small gaps between them, which are filled with fine, angular stone. This design allows water to drain directly through the surface into a prepared gravel base below. This does two critical things: it prevents water from pooling and attacking the expansion joints, and it alleviates hydrostatic pressure by giving water a place to go. In essence, a permeable paver system acts as a massive, integrated French drain. Furthermore, materials with high rates of thermal expansion will put more stress on expansion joints, increasing the risk of failure. Choosing a stable material like a high-quality paver minimizes this stress cycle, preserving the integrity of your entire pool deck system.
Key Takeaways
- A sinking pool deck is a symptom of a “compaction debt” from construction, activated by water erosion.
- Polyurethane foam injection is superior to mudjacking because it both lifts the slab and stabilizes the weak soil underneath without adding weight.
- Identifying critical signs like a tilted water line or step-fractures in tile is non-negotiable for preventing catastrophic pipe breaks.
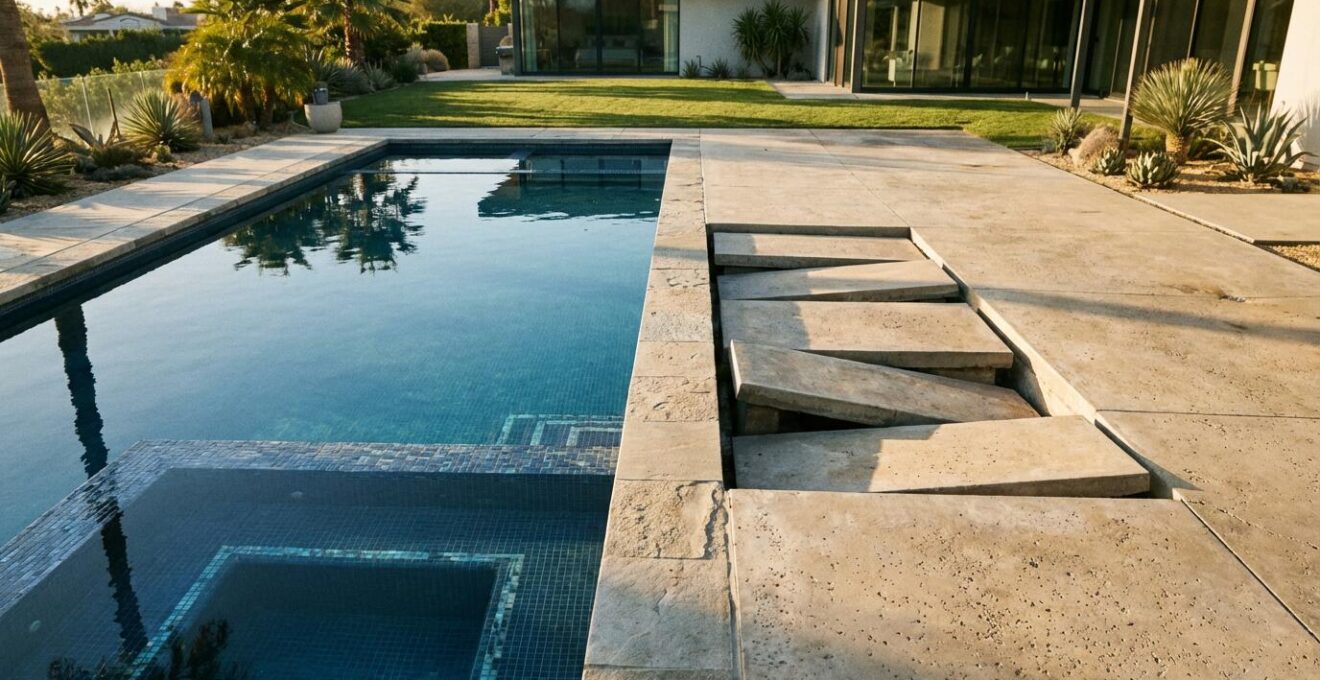
How to Eliminate Trip Hazards Between the Coping and Decking?
The most immediate and dangerous result of a sinking pool deck is the trip hazard created between the stationary pool coping and the dropping concrete slab. This uneven lip is a major liability, and addressing it is not optional. However, the correct method of repair depends entirely on the severity of the height difference, which is a direct reflection of the severity of the underlying subsidence. Applying the wrong fix is, at best, a temporary waste of money and, at worst, a way of masking a problem until it becomes a catastrophe.
Your response should be tiered, following the principles of structural triage. A minor issue can be handled with a DIY approach, but a severe drop is a red flag indicating that professional structural repair is the only safe option. Attempting a surface-level fix on a deep-seated problem is like putting a bandage on a broken bone.
Here is a tiered action plan based on the measured height difference of the trip hazard:
- Level 1 (Minor Gap < 1/4 inch): If the lip is minimal, your primary goal is to seal the joint to prevent further water intrusion. Clean the joint thoroughly, removing any old, cracked sealant and debris. Then, refill the joint with a high-quality, flexible, self-leveling elastomeric sealant designed for concrete expansion joints. This keeps water out and maintains a smooth surface.
- Level 2 (Moderate Lip 1/4 – 1/2 inch): A lip of this size cannot be safely ignored or just filled. You must first eliminate the trip hazard. Use a concrete grinder with a diamond cup wheel to carefully grind down the higher edge of the concrete slab until it is level with the coping. This is a dusty, precise job that requires proper safety gear. Once leveled, clean and seal the joint as described in Level 1.
- Level 3 (Severe Drop > 1/2 inch): A drop of this magnitude is a definitive sign of significant structural failure. Do not attempt to grind this down or fill it with excessive sealant. This is no longer a DIY project. This requires professional slab lifting via polyurethane foam injection to raise the sunken slab back into place and stabilize the failed soil beneath it. This is the only acceptable long-term solution.
Don’t wait for a trip hazard to become a plumbing catastrophe. You are now equipped with the diagnostic knowledge of a specialist. Use this guide to perform your structural triage today, and if you see the warning signs, contact a qualified foundation repair company to secure your investment and ensure your family’s safety.
Frequently Asked Questions on Pool Deck Stability and Landscaping
Which plants should never be planted near a pool?
Avoid plants with aggressive water-seeking root systems like Willows and Silver Maples, as they can break pipes and cause subsidence by drying out clay soils.
What are bioswales and how do they help?
Bioswales are landscaped drainage channels with water-loving plants that actively manage drainage and help absorb excess moisture from the soil, reducing hydrostatic pressure on your pool’s structure.
Which plants work as ‘soil-binding groundcovers’?
Select groundcovers with fibrous, non-invasive roots that prevent surface erosion from rain and pool splash. These plants help to stabilize the soil around your pool deck, acting as a living defense against erosion.