A successful LED pool light upgrade is an electrical system retrofit, not just a bulb swap. The most common failures—flickering, water leaks, and rust—stem from ignoring critical components beyond the light itself.
- Flickering is almost always caused by an incompatibility between the low power draw of LEDs and the high minimum load requirement of an old halogen transformer.
- Water intrusion, the number one cause of premature failure, results from reusing old gaskets or improper faceplate tightening, not a faulty bulb.
Recommendation: Before buying any LED bulb, verify your transformer type and budget for a new gasket and marine-grade stainless steel screws. This focus on system integrity is the only way to ensure safety and longevity.
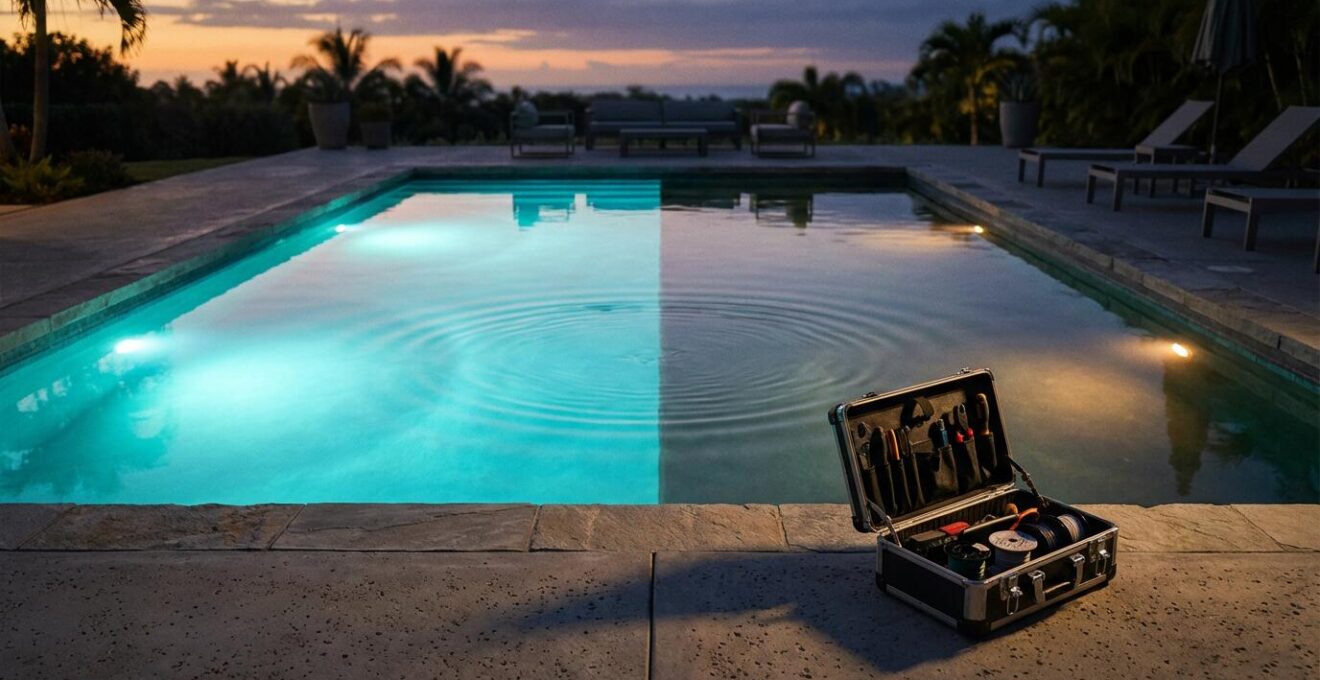
As a retrofit electrician, I’ve seen it countless times: a homeowner excitedly replaces their old, hot 300-watt halogen pool bulb with a vibrant new color-changing LED. A few weeks later, I get the call. The light is flickering, has gone dim, or is completely dead. The promise of energy efficiency and stunning light shows has turned into a frustrating and potentially expensive problem. The temptation to treat this upgrade as a simple screw-out, screw-in job is the single biggest mistake a pool owner can make. The reality is that you are not just changing a light source; you are fundamentally altering an underwater electrical system.
The common advice to “just make sure the power is off” is dangerously simplistic. True success lies in the details that are often overlooked: the transformer’s minimum load, the pliability of a ten-dollar gasket, and even the metallic composition of the faceplate screws. These elements form a complete system, and ignoring one part compromises the whole. This guide moves beyond the basics. We will diagnose the root causes of common failures and provide the practical, safety-first steps to ensure your LED upgrade is not only beautiful but also durable and safe, without the need to drain your entire pool.
This article provides a step-by-step, professional approach to retrofitting your pool lights. We will cover everything from the electrical prerequisites to the final aesthetic touches, ensuring your investment is built to last.
Summary: A Professional Guide to Upgrading Halogen Pool Lights to LEDs
- Why do your 12V LEDs flicker at the far end of the pool?
- How to replace the gasket to ensure zero water enters the light fixture?
- Narrow Spot or Wide Flood: Which Beam Best Illuminates a 10m Pool?
- The screw selection mistake that causes rust streaks on your pool wall
- When to replace light seals preventatively to avoid short circuits?
- How to Use Pool Lighting Colors to Reduce Stress After Work?
- How to Manage Your Pool Chemistry from Your Office Desk?
- Which Luxury Pool Features Add Real Value to a $2 Million Property?
Why do your 12V LEDs flicker at the far end of the pool?
That annoying flicker or strobe effect from your new LED light is the system’s cry for help. It is almost never a faulty LED bulb. The culprit is an electrical mismatch between your new, highly efficient light and your old, power-hungry halogen transformer. Halogen bulbs required a substantial amount of power, so the transformers they were paired with were built to supply it. Many of these older magnetic transformers have a minimum power draw they need to see before they operate stably. According to transformer compatibility studies, most transformers require a minimum 20W load for proper LED operation. A new 15W LED bulb simply doesn’t pull enough power to meet this threshold, causing the transformer to pulse on and off—creating the flicker.
Another factor is voltage drop, especially in larger pools where the light is far from the transformer. The longer the wire run, the more voltage is lost. While a halogen could tolerate this drop, sensitive LED electronics cannot, leading to flickering or dimming. Finally, interference from other equipment on the same circuit, like a variable-speed pump, can introduce “dirty” power that disrupts the LED driver. The key is to see the light and transformer as a matched pair, not interchangeable parts.
This table breaks down the core compatibility issues between transformer types and modern LED lights, providing a clear diagnostic path.
| Transformer Type | LED Compatibility | Common Issues | Solution |
|---|---|---|---|
| Magnetic (Halogen) | Poor | Flickering, won’t turn on | Replace with electronic transformer |
| Electronic (Modern) | Good | May need minimum load | Add dummy load or use LED-specific model |
| LED-Specific | Excellent | None | No changes needed |
How to replace the gasket to ensure zero water enters the light fixture?
The single most critical step for the longevity of your new LED light is replacing the gasket correctly. This flexible ring is the only thing standing between chlorinated water and sensitive electronics. Reusing the old gasket is a catastrophic mistake; it has been compressed for years, lost its pliability, and is full of micro-cracks. A new gasket is not optional, it is mandatory for system integrity. The process begins with what I call electrical hygiene. The surfaces of the light fixture housing and the pool niche must be immaculately clean. Any speck of debris, old sealant, or calcium deposit can create a microscopic channel for water to seep through.
Use a plastic-safe solvent to remove grime, and if you have calcium buildup, a diluted muriatic acid or CLR cleaner will dissolve it. Once the surfaces are pristine and completely dry, apply a thin, even layer of a pool-safe silicone lubricant to the new gasket. This helps it seat properly and prevents it from twisting or bunching up. When tightening the faceplate, never tighten one screw all the way down at once. This creates uneven pressure and warps the seal. Instead, use a star pattern, tightening each screw a little at a time, moving to the one opposite it, until all are uniformly snug. This ensures even compression around the entire fixture.
This image demonstrates the correct sequence for tightening the faceplate screws to guarantee a watertight seal.
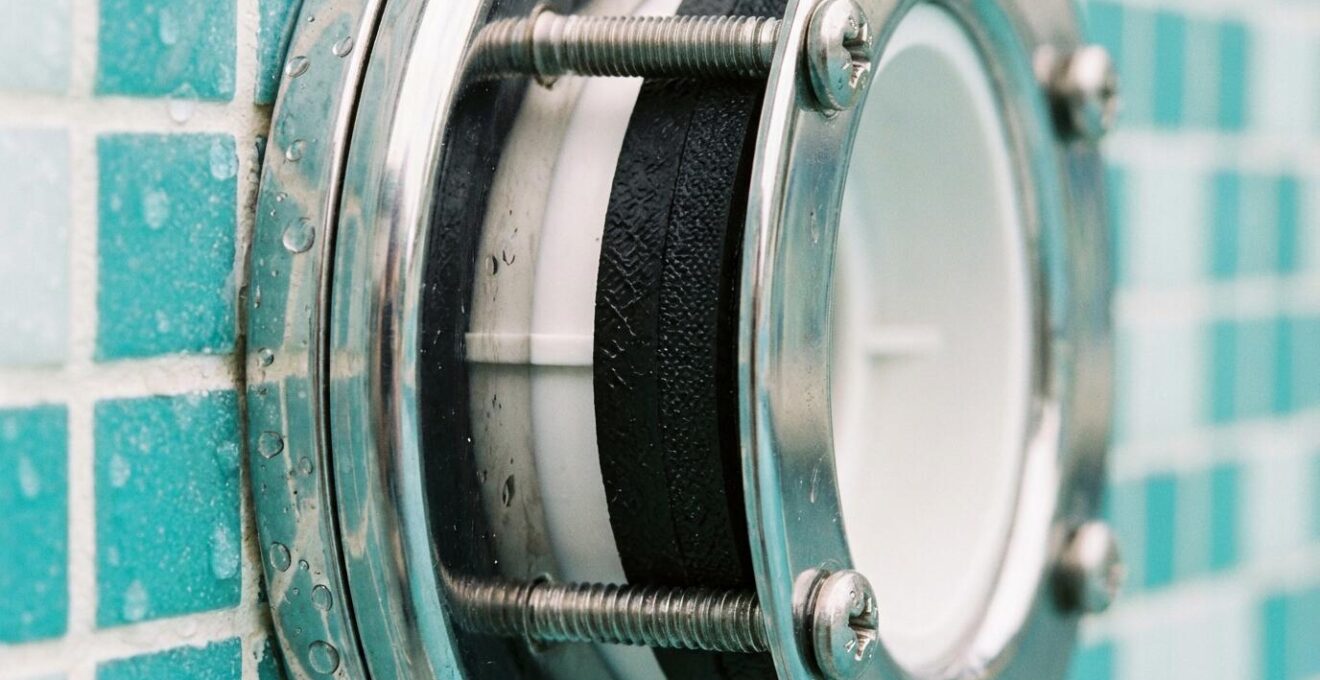
As you can see, this methodical approach distributes pressure evenly, which is the professional standard for preventing leaks. A seal achieved this way will protect your investment for years.
Narrow Spot or Wide Flood: Which Beam Best Illuminates a 10m Pool?
Choosing the right beam angle is as important as choosing the light itself. It’s the difference between a pool that’s beautifully and evenly illuminated, and one with distracting hot spots and dark, murky corners. For a standard residential pool around 10 meters (about 33 feet) long, the goal is uniform coverage. A single light with a narrow spot beam (30-40 degrees) is a poor choice for general illumination. It will create a bright, intense circle of light in the center of the pool, leaving the ends and sides in shadow, which can be a safety concern as well as an aesthetic failure.
The professional solution for a pool of this size is almost always one or two fixtures with a wide flood beam (100-120 degrees). A single wide flood light, properly placed, can often illuminate the entire 10m length with soft, even light. For superior results, designers often use two wide flood lights, one at each end, to completely eliminate shadows. The best lighting designs often employ a hybrid approach: using wide flood lights for the main body of water and adding a small, narrow spot beam to accent a specific feature like a staircase, a water fountain, or a tanning ledge. This layered approach provides both excellent functional lighting for safety and dramatic visual interest.
This table helps visualize how different beam angles translate to actual coverage in a typical 10-meter pool.
| Beam Type | Angle | Coverage (10m pool) | Best Use |
|---|---|---|---|
| Narrow Spot | 30-40° | 3-4m diameter | Accent features, steps |
| Medium Flood | 60-80° | 6-7m diameter | Combination lighting |
| Wide Flood | 100-120° | 8-10m diameter | General illumination |
The screw selection mistake that causes rust streaks on your pool wall
It’s a tiny detail that creates a huge, ugly problem: unsightly rust streaks running down your pool wall from the light fixture. This is a classic sign of an amateur installation, and it’s caused by using the wrong type of screws. Not all stainless steel is created equal, especially in the harsh, corrosive environment of a chlorinated or saltwater pool. Many DIYers grab standard “stainless steel” screws from a hardware store, which are typically 304 grade. While fine for a deck, they are not sufficient for continuous underwater use. The chlorides in pool water will attack 304-grade steel, causing it to rust over time.
The professional standard is non-negotiable: you must use 316 marine-grade stainless steel for any metal component submerged in a pool. The addition of molybdenum in 316-grade steel gives it vastly superior corrosion resistance. In fact, materials science research demonstrates that 316 marine-grade stainless steel lasts 5x longer than 304 in chlorinated water. This simple choice prevents rust stains, ensures the structural integrity of the fixture, and makes future servicing possible without having to drill out rusted-in-place screws. It’s a few extra dollars for a set of screws that saves you from a major aesthetic and maintenance headache down the road. This is a perfect example of how focusing on system integrity, down to the smallest component, defines a professional job.
Action Plan: Preventing Corrosion on Pool Fixtures
- Identify Metals: Inventory all metal types in your light fixture, niche, and bonding wire to understand potential corrosion points.
- Select Screws: Use only 316 marine-grade stainless steel screws for all submerged components. Verify the grade before installation.
- Isolate Threads: Apply a thin coat of dielectric grease or PTFE tape to the screw threads to create a barrier against galvanic corrosion.
- Add Anode: If mixing different metals (e.g., a bronze niche with a stainless steel faceplate) is unavoidable, install a zinc sacrificial anode to protect the more noble metals.
- Inspect & Replace: After installation, visually inspect the screws weekly for the first month. At the first sign of rust, replace the screw immediately.
When to replace light seals preventatively to avoid short circuits?
Waiting for your light to fail before you think about its seals is a costly mistake. Water intrusion is the number one killer of LED pool lights, and a failed gasket will short-circuit the electronics, turning a simple maintenance task into a major replacement. Pool maintenance data reveals that the average cost for a water-damaged LED fixture replacement is over $500. A preventative approach is far more economical. The rule is simple: the light gasket should be replaced every time the fixture is opened, and a proactive replacement schedule should be followed even if the light is working perfectly.
But how do you know if a seal is nearing the end of its life? As a general rule, a high-quality gasket in a well-balanced pool should be preventatively replaced every 5 years. In pools that frequently run high chlorine levels or are in hot climates, this should be shortened to every 3 years. You can perform a quick “brittle test” on the old gasket once removed: a healthy gasket will feel pliable and bounce back when compressed. An old one will feel hard, may crack, and will stay compressed. It’s lost its ability to create a dynamic seal.
This macro image shows the subtle but critical signs of a deteriorating gasket that a casual inspection would miss.
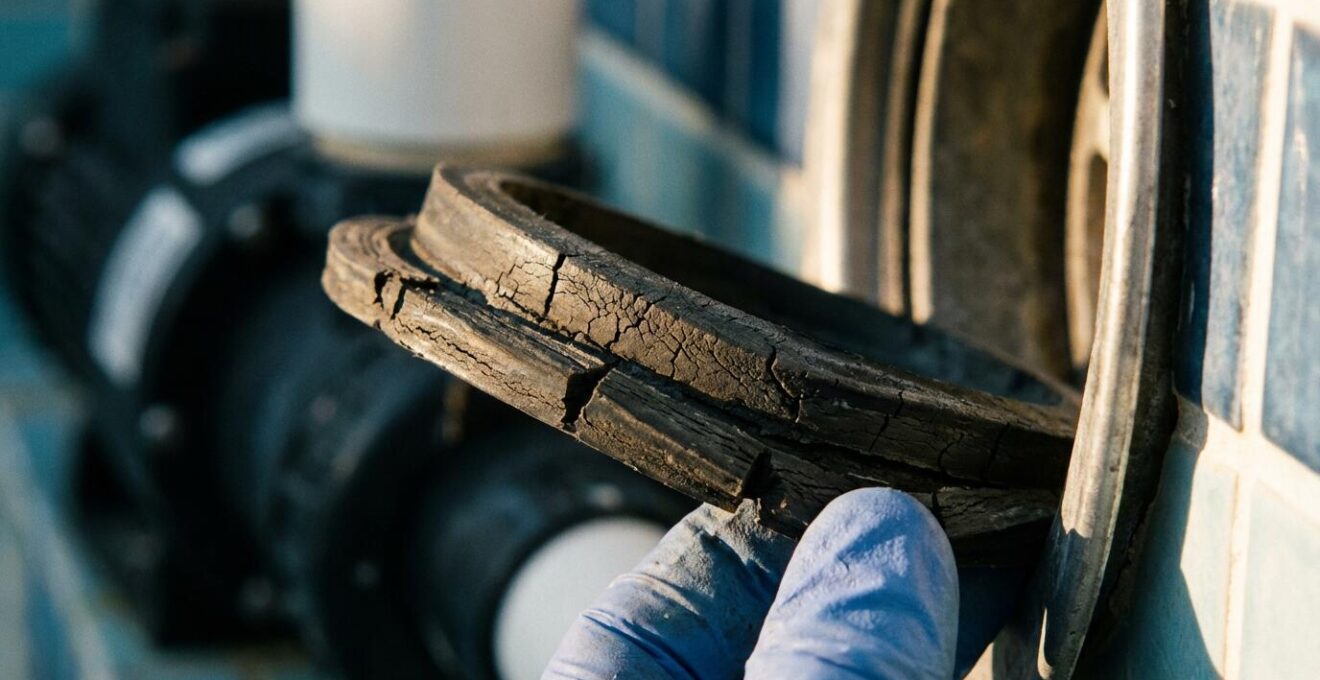
Look for micro-cracks, flattening, and a chalky appearance. These are all signs that the rubber has degraded and a failure is imminent. Thinking of the gasket’s lifespan, not the bulb’s, is the professional mindset that prevents expensive, water-related failures.
How to Use Pool Lighting Colors to Reduce Stress After Work?
Once your LED system is installed correctly and safely, you can unlock one of its greatest benefits: the ability to transform your pool’s ambiance and influence your mood. Modern LED systems are not just about bright, saturated colors for parties. They offer a sophisticated palette that can be used to create a tranquil, stress-reducing environment. The key is to move away from intense, jarring colors and toward softer, more natural tones that support your body’s transition from a busy day to a restful evening. Think of your pool as a giant light therapy device.
As the sun sets, start with a warm white light (around 3000K) to mimic the golden hour. As dusk turns to evening, transition to a soft amber or a gentle, desaturated blue. These colors are less stimulating to the brain than harsh whites or vibrant greens and reds. Deep, pure blues can create a serene, meditative state, perfect for a quiet swim. Avoid rapidly changing “disco” modes when your goal is relaxation; instead, program slow, seamless transitions between calming colors. As noted by industry experts, this is a growing trend. According to Pool Design Quarterly in their “Modern Pool Lighting Trends 2024” report:
Color-changing LED pool lights enable owners to create customized lighting scenes that transition from energizing daytime colors to calming evening tones, supporting natural circadian rhythms
– Pool Design Quarterly, Modern Pool Lighting Trends 2024
By syncing these light scenes with a relaxing playlist, you can create a powerful, multi-sensory experience that helps melt away the day’s stress. Your pool becomes more than a place to swim; it becomes a personal wellness retreat.
How to Manage Your Pool Chemistry from Your Office Desk?
The true luxury of a modern pool is not just how it looks, but how it operates. A properly installed LED lighting system is the gateway to full pool automation, allowing you to monitor and even manage critical functions like water chemistry from anywhere. This is achieved by integrating your lighting with a smart pool management system. These systems use a series of in-water sensors to continuously monitor key parameters like pH, ORP (chlorine effectiveness), and temperature. This data is sent in real-time to an app on your phone.
The real magic happens when you link this data to your lighting. You can create simple but powerful “If This Then That” rules. For example: “If pH drops below 7.2, turn the pool light to yellow.” This provides an immediate, at-a-glance visual indicator that your pool needs attention, long before you would have noticed during a weekly manual test. Some advanced systems can even take automated action. They can trigger a chemical feeder to dose the appropriate amount of acid or chlorine and then confirm the action by changing the light color to green once the chemistry is back in balance.
Case Study: Smart Pool Monitoring System Integration
Modern smart pool systems like Sutro and pHin use predictive AI to forecast chemical needs based on weather patterns and historical data. One pool owner reported catching a potential algae bloom 3 days early when the system detected pH drift and automatically triggered super-chlorination while sending a yellow light alert to the pool LED system.
This level of integration turns your pool lights from a purely aesthetic feature into a dynamic part of your pool’s health monitoring system. It provides peace of mind and allows you to proactively manage your pool, preventing small issues from becoming big problems, all from the convenience of your office desk.
Key Takeaways
- A flicker in a new LED light is almost always a sign of an incompatible halogen-era transformer, not a faulty bulb.
- Replacing the light’s gasket with a new, lubricated one and tightening the screws in a star pattern is the most critical step to prevent water leaks.
- Forgoing cheap hardware store screws for 316 marine-grade stainless steel is essential to prevent rust streaks on your pool wall.
Which Luxury Pool Features Add Real Value to a $2 Million Property?
In the luxury real estate market, a pool is an expectation. What adds real, measurable value is not just the presence of the pool, but the sophistication and seamlessness of its features. An intelligent, automated LED lighting system is no longer just a “nice-to-have”; it’s a core component that signals a high-quality, modern, and efficient property. The first and most direct value-add is energy efficiency. The switch from old halogen lights to LEDs is dramatic, with recent energy efficiency studies confirming an 85-90% energy reduction compared to halogen pool lights. For a high-end property with multiple large lights, this translates into significant, easily demonstrable annual savings that appeal to discerning buyers.
However, the true value lies in integration. A lighting system that can be controlled from a phone, that changes colors to reflect water chemistry, and that integrates with the home’s main automation platform elevates the property from merely “having a pool” to “possessing a smart outdoor oasis.” This level of turnkey convenience and technological sophistication has a direct impact on perceived value and final sale price.
Case Study: ROI of Integrated Pool Lighting Systems
Luxury real estate analysis shows homes with fully integrated pool automation systems (lighting, pumps, heating controlled via single app) command a 3-5% premium over similar properties. One $2M property in California saw offers increase by $75,000 after showcasing the LED lighting system’s annual $2,400 energy savings during evening showings.
Ultimately, a professionally installed, fully integrated LED lighting system adds value because it enhances the owner’s experience. It reduces operating costs, simplifies maintenance, improves safety, and transforms the backyard into a stunning visual spectacle. It is a feature that pays for itself both in enjoyment and in the final sale price of the property.
To ensure your pool upgrade not only looks spectacular but also adds tangible value and operates safely for years, applying these professional standards is the only path forward. Evaluate your current system today and plan your retrofit with system integrity as your top priority.