In summary:
- Treat your poolside area as a unique micro-ecosystem, not just a difficult patch of dirt.
- Select plants based on their physical traits (like waxy leaves) that provide natural chemical resistance.
- Engineer the landscape to control water, from irrigation runoff to splash, using mulch and grading.
- Prioritize the pool’s structural integrity by respecting safe planting distances for roots.
- Use a layered approach for immediate privacy while permanent solutions grow in.
The dream is a lush, green paradise framing a sparkling blue pool. The reality for many gardeners is a frustrating cycle of scorched leaves, yellowing grass, and dying plants. You’ve followed the common advice—you’ve picked “hardy” varieties and tried to shield them from splashes—yet the hostile microclimate created by chlorinated water, intense reflected heat, and compacted soil claims victim after victim. This constant battle leaves you wondering if a beautiful poolside garden is even possible without resorting to a sterile landscape of concrete and plastic.
Most guides offer simple lists of “salt-tolerant” plants, but this only addresses a fraction of the problem. They fail to explain the underlying mechanics of this unique and challenging environment. The truth is, creating a thriving poolside garden is less about finding a few invincible plants and more about intelligent ecological design. It’s an exercise in engineering a landscape that actively buffers, redirects, and neutralizes the specific stresses your pool creates, from chemical assault to hydrological chaos.
But what if the solution wasn’t to fight the pool’s environment, but to work with it? What if, instead of just selecting plants, you could design a system where soil, mulch, and water management work in concert to protect your greenery? This guide moves beyond the platitudes. We will explore the botanical science and landscape strategies required to build a resilient garden that doesn’t just survive, but truly flourishes. We’ll deconstruct the specific challenges—from chemical splash zones to underground pipe threats—and provide engineered solutions for each.
This article will provide a complete blueprint for transforming your poolside from a plant graveyard into a thriving oasis. Here is a look at the specific problems we will solve, turning your gardening frustration into strategic success.
Summary: The Resilient Poolside Garden: How to Create a Lush Oasis in a Hostile Microclimate
- Which flowering shrubs can survive direct chlorine splash zones?
- How to water plants without flooding the pool with muddy runoff?
- River Rock vs Bark Mulch: Which Stays Put During Cannonballs?
- The planting distance mistake that leads to cracked pipes underground
- When to prune overhanging branches to minimize skimmer maintenance?
- How to Create a Biophilic Transition That Hides Equipment Without Blocking Access?
- How to Block the Neighbor’s View of Your Pool Immediately?
- How to Fix Soil Subsidence Around Your Pool Deck Before Pipes Break?
Which flowering shrubs can survive direct chlorine splash zones?
The primary assault on poolside plants is chemical, but “chlorine tolerance” is more than just a vague label. It’s a measurable botanical trait. The key isn’t just to hope a plant is tough, but to understand the mechanisms that confer this resilience. For most vegetation, damage begins to appear sooner than you might think; research shows that most garden crops start showing stress at around 2 ppm free chlorine. Since pool water is often higher, direct and repeated splashing can be fatal.
So, what makes a plant a survivor? The secret often lies in its physical defenses. Plants with thicker, waxy cuticles on their leaves and flowers, such as the classic Rubber Plant (Ficus elastica) or Wax Myrtle (Myrica cerifera), possess a natural raincoat. This waxy layer physically repels the chlorinated water, preventing the chemicals from being absorbed directly into the delicate leaf tissue where they can cause cellular damage. These plants maintain their vibrant appearance precisely because they have this built-in protection against the chemical onslaught that would scorch more sensitive varieties.
Beyond plant selection, management is your next line of defense. When irrigating, always aim for the soil, not the foliage. Soil has a complex biology that can help buffer and break down small amounts of chlorine. Foliage has no such defense. Watering in the cool of the morning or evening prevents heat stress, which makes plants more vulnerable to chemical damage. And critically, rotate your water source. If you must occasionally use pool water, ensure you flush the root zone thoroughly with fresh water afterward to dilute any residual chlorine and prevent salt buildup in the soil.
How to water plants without flooding the pool with muddy runoff?
A thriving garden needs water, but a clean pool demands that soil and fertilizer stay out. The conflict between irrigation and pool hygiene is a core challenge of poolside landscaping. The solution lies in precise hydrological control—designing a system where water goes exactly where it’s needed and nowhere else. Surface watering with a hose or sprinkler is the primary culprit, creating a sheet of runoff that carries topsoil, mulch, and nutrients directly into your pool, feeding algae and clogging filters.
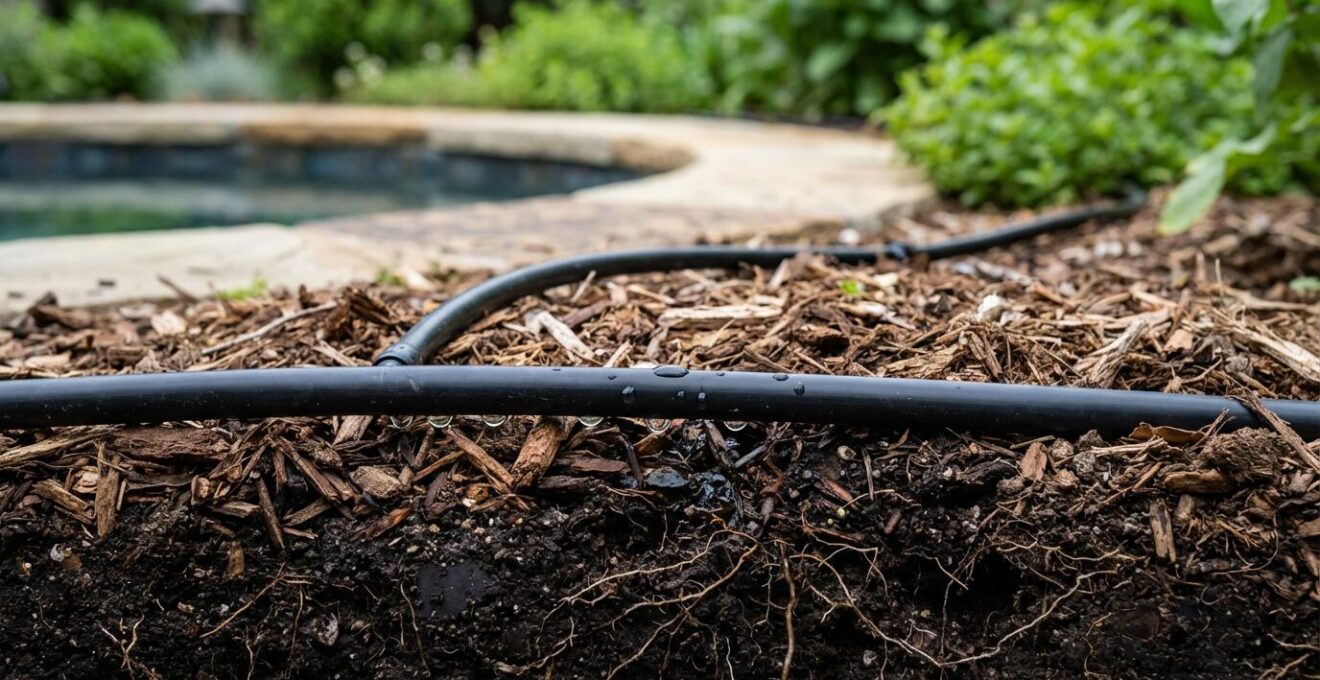
To prevent this, you must deliver water directly to the plant’s root zone. As the illustration above shows, subsurface drip irrigation is the gold standard for this task. By burying drip lines under a layer of mulch, you eliminate surface evaporation and runoff entirely. Water is delivered slowly and precisely to the roots, maximizing efficiency and keeping the soil surface dry and stable. This method also minimizes the concentration of pool chemicals on plant foliage, as it avoids any form of spraying or splashing.
The following table outlines key strategies for effective poolside irrigation, focusing on both water delivery and soil management. Adopting these methods transforms your watering routine from a potential problem into a cornerstone of your garden’s health and your pool’s cleanliness. This data, based on a comparative analysis of irrigation techniques, highlights how physical barriers and smart systems create a clean, efficient micro-ecosystem.
| Method | Benefits | Runoff Control |
|---|---|---|
| Subsurface Drip Lines | Deliver water directly to root zones without wetting foliage, minimizing chemical concentrations on leaves | Eliminates surface evaporation and runoff entirely |
| Organic Mulch Layer | Helps retain soil moisture while minimizing evaporation that could concentrate salt levels | Creates physical barrier containing water and topsoil |
| Raised Planting Beds | Create excellent drainage to provide additional protection by allowing potentially harmful salts to move away from sensitive root zones during irrigation or rainfall events | Prevents water from flowing toward pool |
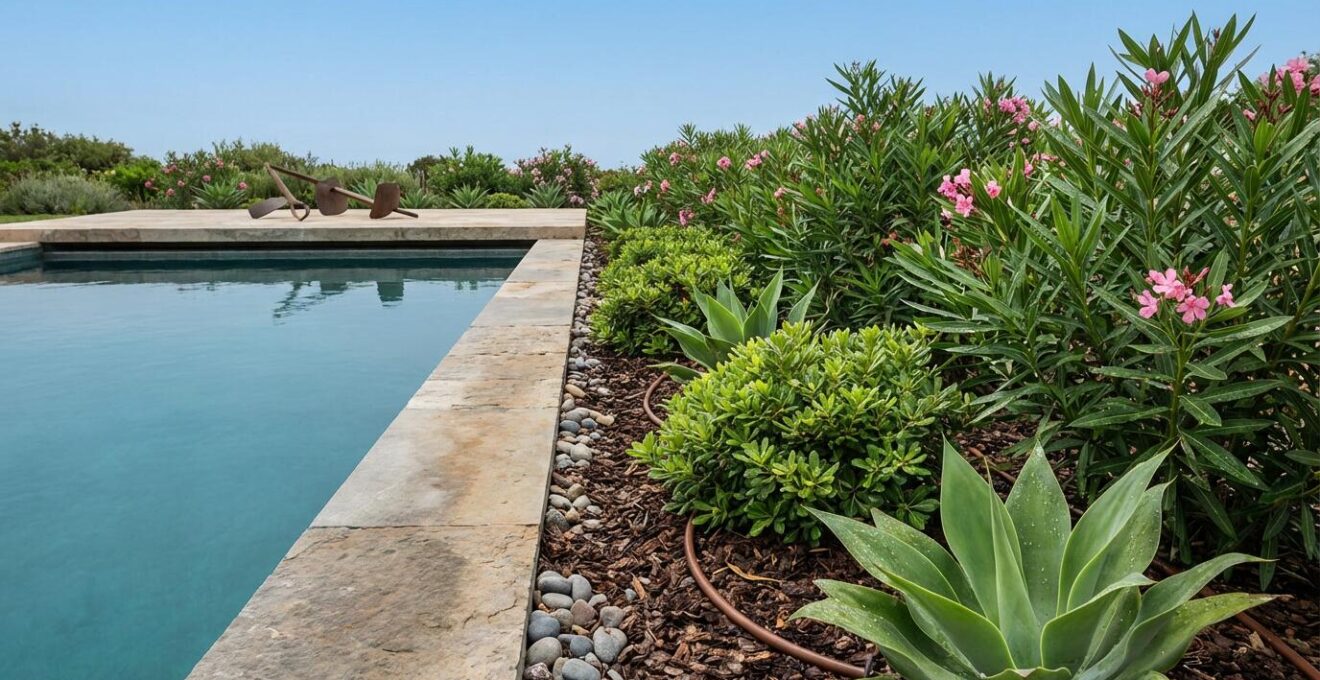
River Rock vs Bark Mulch: Which Stays Put During Cannonballs?
Mulch is non-negotiable in a poolside garden. It conserves moisture, suppresses weeds, and regulates soil temperature under the intense, reflected sun. But in the high-activity zone of a pool, not all mulches are created equal. The choice between organic bark and inorganic river rock becomes a crucial engineering decision. Bark mulch is excellent for soil health, breaking down over time to add organic matter. However, its light weight is its downfall; a single enthusiastic cannonball can send a flotilla of bark chips straight into your skimmer basket and filter system.
River rock, by contrast, is the champion of stability. Its weight keeps it firmly in place, even with significant splashing. It provides a clean, modern aesthetic and won’t clog your pool equipment. However, it has drawbacks. Rocks absorb and radiate heat, potentially ‘baking’ the root zones of sensitive plants. They also do nothing to improve soil structure. A practical compromise is to use river rock in the immediate “splash zone” (the first 1-2 feet from the pool edge) and transition to a thick organic bark mulch further back. This gives you stability where it matters most and soil benefits where the risk of displacement is lower.
Regardless of your choice, application depth is key. A generous 3-4 inch mulch layer is recommended to effectively retain moisture and insulate the soil. An often-overlooked but brilliant alternative is “living mulch.” Using a dense, low-growing, and non-slip ground cover like Purslane (Portulaca) around the pool’s edge provides all the benefits of mulch while creating a soft, green carpet that’s completely splash-proof. This biophilic approach fully integrates the ground layer into the garden’s ecosystem, eliminating the problem of loose material entirely.
The planting distance mistake that leads to cracked pipes underground
The most catastrophic poolside gardening error happens silently, underground. While we focus on the visible foliage, the real threat to your pool’s longevity comes from aggressive root systems. A tree planted too close may look beautiful for years, but its expanding roots can exert immense pressure on the pool shell, plumbing lines, and decking, leading to cracks, leaks, and catastrophic repair bills. This isn’t a possibility; for certain species, it’s an inevitability. Preventing this damage requires a non-negotiable respect for safe planting distances.
The general rule of thumb is to maintain a buffer zone. As a baseline, experts recommend planting at least 6 to 8 feet minimum from the pool’s edge, even for smaller, low-growing specimens. For trees or large shrubs known for extensive root systems (like willows or silver maples), this distance should be increased to 15 feet or more. It’s also wise to avoid deciduous trees that drop massive amounts of leaves, or any plant with sharp spines or messy cones that create a hazard for bare feet.
Root zone management is a foundational principle of poolside safety. Simply choosing a “pool-friendly” plant isn’t enough; you must place it where its mature form, both above and below ground, will not interfere with the pool’s infrastructure. The following checklist provides a framework for making safe and sustainable planting decisions.
Your Action Plan: Safe Planting from Pool Infrastructure
- Assess the Buffer Zone: Plant trees and large shrubs at least six to eight feet away from the pool edge to prevent root damage to the structure and underground pipes.
- Account for Aggressive Species: For plants with known aggressive root systems, increase the minimum planting distance to a more conservative 10-15 feet.
- Consider Root Barriers: For essential plantings closer than ideal, install commercial-grade polyethylene root barriers vertically in the ground alongside plumbing to deflect root growth.
- Avoid High-Litter and Hazardous Plants: Steer clear of deciduous trees that drop excessive leaves, and avoid any plants with sharp spines or cones that could injure barefoot swimmers.
- Research Mature Size: Before planting, always confirm the mature height and spread of a plant to ensure it won’t overhang the pool or block pathways in the future.
When to prune overhanging branches to minimize skimmer maintenance?
A significant portion of pool maintenance involves fishing out leaves, twigs, and flowers that have fallen into the water. This debris not only looks messy but also clogs skimmers, strains pumps, and introduces organic matter that consumes chlorine and feeds algae. While selecting low-litter plants is the first line of defense, proactive pruning is the second. The goal is to remove potential debris *before* it has a chance to drop. This requires a strategic approach timed to the plant’s natural life cycle.
Simply pruning whenever a branch gets too long is inefficient. A well-timed trim can dramatically reduce the amount of litter your pool collects. For example, pruning a flowering tree like a Crape Myrtle *immediately after* it blooms removes all the spent flowers in one go, preventing them from shedding into the water over the next several weeks. Similarly, trimming a fruit-bearing tree before the fruit fully develops prevents a messy, critter-attracting problem later in the season. For evergreens, which shed minimally, an early spring pruning is usually sufficient to maintain shape and remove any winter damage.
The key is to think like a maintenance professional, not just a gardener. By understanding the littering patterns of your specific plants, you can create a pruning schedule that keeps your pool cleaner with less effort. The following table provides a clear guide for timing your pruning based on plant type.
| Plant Type | When to Prune | Reason |
|---|---|---|
| Flowering Trees | After blooming | Removes spent flowers before they drop |
| Fruit Trees | Before fruit sets | Prevents messy fruit drop near pool |
| Deciduous Trees | Just before leaf-drop | Reduces seasonal leaf litter in pool |
| Evergreens | Early spring | Minimal shedding, shape control |
How to Create a Biophilic Transition That Hides Equipment Without Blocking Access?
Pool pumps, filters, and heaters are essential, but their bulky, utilitarian appearance can ruin the tranquil, natural aesthetic of a poolside oasis. The challenge is to conceal this equipment effectively without hindering the crucial access needed for maintenance and repairs. A permanent, solid wall can create more problems than it solves. The solution is a “living screen” that is both beautiful and functional, blending biophilic design with practical engineering.
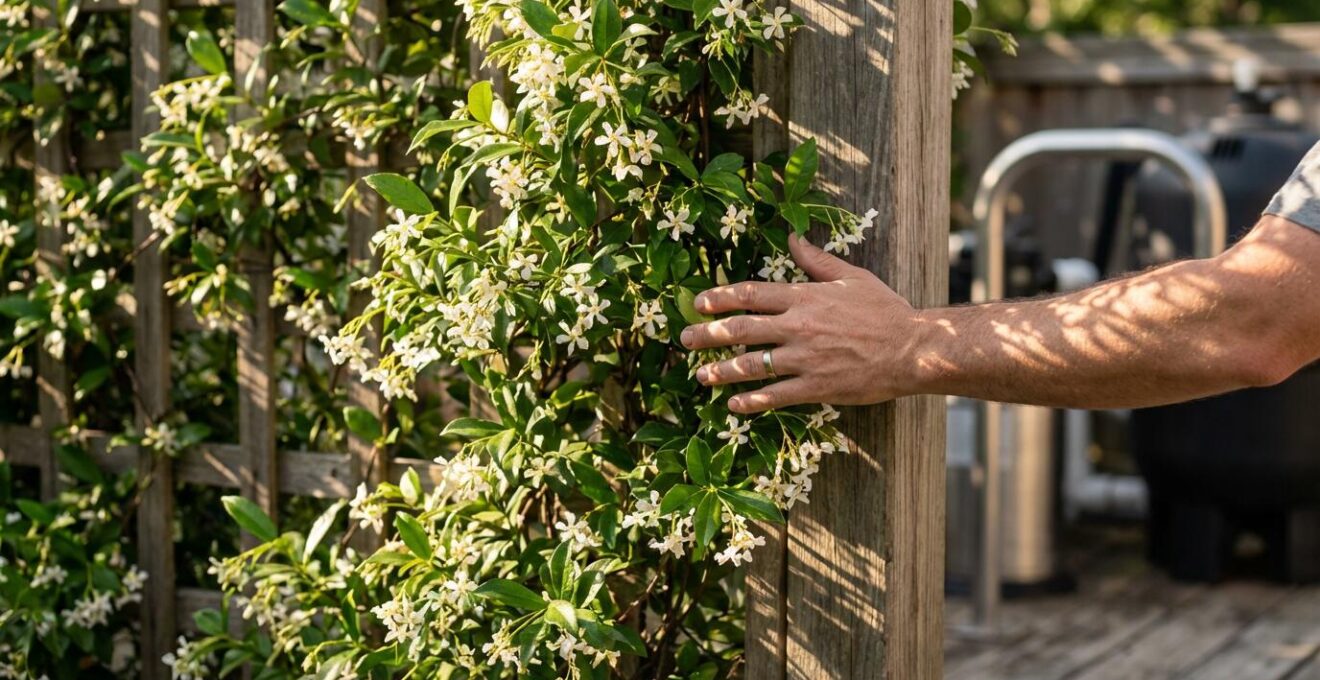
The most flexible approach is to use movable green walls. By mounting large architectural planters on heavy-duty, lockable casters, you can create a dense screen of tall grasses or evergreen shrubs that can be easily rolled away when access is needed. This provides an instant, solid-looking green barrier that remains completely modular. Another effective strategy is to install a permanent, decorative trellis a foot or two in front of the equipment. This structure can support fast-growing, non-littering climbing vines like Jasmine or Star Jasmine, creating a fragrant, lush curtain that can be gently pushed aside for maintenance, as shown in the image.
For these container-based solutions to succeed, a few botanical rules apply. The plants must be suited for your climate’s full sun exposure and planted in well-drained, high-quality soil. Containers dry out much faster than garden beds, so ensuring excellent drainage and adding organic matter to the soil is critical to regulate moisture and prevent root rot. A thick layer of mulch on top of the container soil will further help retain moisture. The final touch is to place a few smaller, easily movable potted plants in front of the main screen to create a layered, more natural-looking transition from the patio to the green wall.
How to Block the Neighbor’s View of Your Pool Immediately?
A pool is a private retreat, but achieving that sense of seclusion can feel like a slow-motion race against time when you’re waiting for shrubs to grow. While a mature evergreen hedge is the ultimate solution, it can take years to provide a solid screen. For immediate privacy, you need a multi-layered strategy that combines fast-growing temporary solutions with permanent plantings, giving you coverage from day one.
The first step is to install an instant, non-living screen. This could be a series of decorative metal panels, a wooden lattice fence, or even stylish sail shades strategically angled to block the most critical sightlines. This provides your immediate privacy shield. Step two is to plant a fast-growing annual vine, like the vibrant Hyacinth Bean, to climb this temporary structure. It will quickly cover the fence or trellis in a single season, softening its appearance with lush greenery.
Simultaneously, you execute step three: planting your permanent hedge. In front of the temporary screen, plant a row of robust, fast-growing evergreens like Yew, Holly, or, for a modern look, a clumping variety of bamboo like Slender Weaver’s Bamboo. Set back slightly from the pool’s edge, these plants will begin to establish themselves under the cover of the temporary screen. Within two to three years, as the permanent hedge grows tall and dense enough to provide complete privacy on its own, you can simply remove the annual vines and, if desired, the initial hardscape screen. This double-layer strategy provides the instant gratification of privacy while patiently cultivating the long-term, natural solution.
Key Takeaways
- A thriving poolside garden depends more on landscape engineering (managing water, soil, and roots) than on finding a few “invincible” plants.
- Physical plant traits, like waxy leaves, are a better indicator of chlorine resistance than generic labels.
- Controlling water is paramount: use subsurface drip irrigation to prevent runoff and flush the root zone with fresh water after any chemical exposure.
How to Fix Soil Subsidence Around Your Pool Deck Before Pipes Break?
One of the most insidious threats to a pool’s structural integrity is soil subsidence. The ground around the pool deck can begin to sink or wash away, creating dangerous voids that leave plumbing lines unsupported and put immense stress on the pool’s concrete shell. This issue is often caused by poor soil compaction during construction, but it can be severely exacerbated by poor water management in the surrounding landscape. Constant over-watering, poor drainage, or a significant leak can saturate the soil, causing it to lose its structure and wash away over time.
Identifying the cause is the first step. Is there a perpetually soggy area? Are there visible cracks forming between the deck and the surrounding ground? A DIY test for a leak involves placing a bucket of water on the deck and marking the water level in both the bucket and the pool; if the pool’s water level drops significantly more than the bucket’s (which accounts for evaporation), you likely have a leak that is contributing to soil erosion. If there’s no leak, the problem is likely related to drainage and irrigation runoff.
While fixing major subsidence often requires professional intervention like foam jacking or mudjacking to fill the voids, preventing it is a matter of landscape design. This connects directly back to hydrological control. Ensuring that all rainwater and irrigation runoff is graded to flow *away* from the pool deck is critical. In situations involving large amounts of water, such as draining a portion of the pool for maintenance, the chemical content becomes a factor. It is absolutely essential to ensure the chlorine level is low before releasing water into the landscape; anything above 0.1 parts per million (ppm) can kill plants and harm the soil biology that helps maintain stable soil structure. A healthy, well-drained soil ecosystem is your best long-term defense against subsidence.
By approaching your poolside garden as an integrated ecosystem, you move from being a frustrated gardener to a strategic landscape designer. The next logical step is to audit your own space using these principles to create a specific action plan for your yard.