Travertine’s coolness isn’t magic; it’s a result of its porous structure that actively dissipates heat, a feature inert stones like granite lack.
- Light color and high Solar Reflectance Index (SRI) are only part of the story; surface texture and internal moisture evaporation are key.
- Choosing the right stone involves preventing future issues like iron staining, chlorine fading, and trip hazards from the start.
Recommendation: Focus on the stone’s grade and origin, and use penetrating sealers to protect its character without creating a slippery surface.
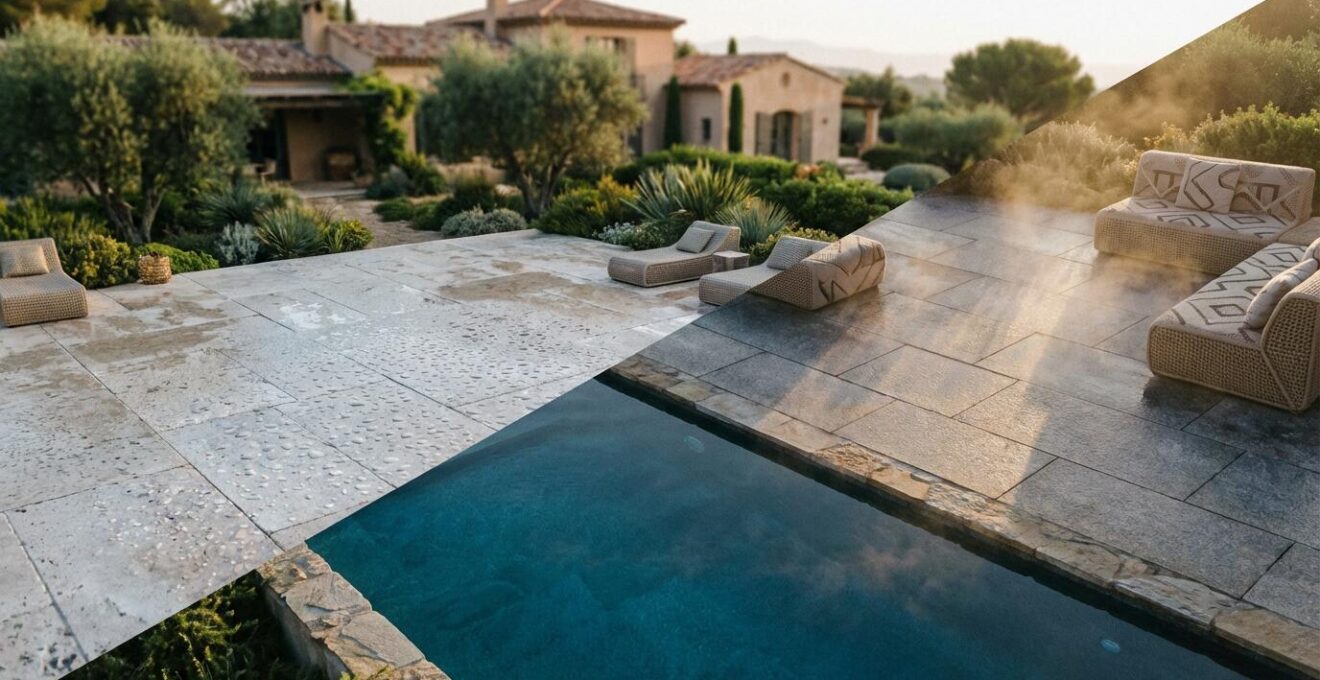
The familiar summer ritual: a hesitant dance across a sun-baked pool deck, the searing heat forcing a sprint to the cool relief of the water. Many homeowners assume this is an unavoidable consequence of using stone in hot climates, especially with dense materials like granite. The common advice is simply to “choose a lighter color,” but this barely scratches the surface of the issue. The real difference between a comfortable, barefoot-friendly deck and a scorching hotplate lies not just in color, but in the very soul of the stone itself—its internal structure and how it interacts with the elements.
As stone importers, we understand that a material’s true value is revealed over time. The conversation should move beyond simple heat absorption to a more holistic understanding of a stone’s performance. We need to consider its “thermal inertia” versus its ability to actively cool itself. This involves looking at its porosity, its surface texture, and even the microscopic pockets of moisture it holds. This is the difference between a static, inert surface that simply stores heat and a dynamic, living surface that breathes.
This is where travertine excels, but it’s not the only player. Understanding the principles of cool hardscaping allows you to select a material that not only feels good underfoot but also develops a graceful patina, aging with character rather than just degrading. This guide will explore the science behind why some stones stay cool, how to choose and protect them from common pitfalls like salt damage and chlorine fading, and how to build a deck that is both beautiful and enduring.
To help you navigate these crucial decisions, this article breaks down the essential factors for selecting, installing, and maintaining the perfect natural stone pool deck. Here’s a look at what we’ll cover.
Summary: The Secrets to a Cool and Enduring Natural Stone Deck
- How to Select Hardscaping Materials That Stay Cool Under the Summer Sun?
- Why Travertine Remains Cool to the Touch Even in 35°C Direct Sunlight?
- Limestone or Slate: Which Natural Stone Resists Chlorine Fading Better?
- The iron content mistake that turns your grey stone orange
- How to use uncalibrated flagstone for a rustic farmhouse look?
- How to Eliminate Trip Hazards Between the Coping and Decking?
- How to seal natural stone to prevent salt damage without making it slippery?
- When to pressure wash natural stone vs letting it weather naturally?
How to Select Hardscaping Materials That Stay Cool Under the Summer Sun?
The secret to a comfortable poolside surface begins with understanding the physics of heat. It’s not just about color. The primary scientific measure for a material’s coolness is the Solar Reflectance Index (SRI). This value, on a scale of 0 to 100, combines a material’s ability to reflect solar energy with its capacity to release absorbed heat. A dark, polished material might have an SRI near 0, while a bright white, textured surface could approach 100. Choosing materials with a high SRI is the first step; in fact, materials with an SRI of 70-100 stay 5-20% cooler than standard concrete, making a tangible difference underfoot.
However, SRI is not the only factor. The material’s texture and finish play an equally critical role. A polished surface, even in a light color, has a smooth, flat plane that absorbs and concentrates heat. In contrast, a more textured finish—such as honed, flamed, or sandblasted—creates micro-shadows and increases the surface area, allowing heat to dissipate more effectively into the surrounding air. This principle is not just theoretical; it has been proven in direct comparisons.
Surface Finish Impact on Heat Absorption
Testing on identical stone materials with different finishes revealed dramatic temperature differences. As demonstrated in surface temperature studies, honed or sandblasted finishes stayed significantly cooler than polished surfaces due to increased surface area for heat dissipation and light diffusion. For example, a flamed granite with a textured surface measured 10-22% cooler than polished granite under identical sun exposure conditions. This proves that choosing a textured finish is as important as choosing a light color for managing surface heat.
Therefore, a truly effective selection process looks beyond a simple color swatch. It involves specifying a stone with a naturally high SRI and a finish that actively works to disperse heat. This combination creates a surface that is inherently cooler and more comfortable, forming the foundation of a barefoot-friendly outdoor space.
Why Travertine Remains Cool to the Touch Even in 35°C Direct Sunlight?
While high SRI and texture explain part of the story, they don’t fully account for travertine’s remarkable ability to stay comfortable in extreme heat. Unlike dense, non-porous stones like granite that act like thermal batteries—storing solar energy and radiating it back—travertine possesses a unique internal structure that provides an “active cooling” mechanism. This stone is naturally filled with interconnected pores and tiny cavities, a remnant of its formation process around ancient hot springs. This porosity is the key to its superior thermal performance.
First, these air-filled pockets act as natural insulators, slowing the transfer of heat from the sun-drenched surface to the body of the stone. The heat remains concentrated on the very top layer rather than penetrating deeply. Second, and more importantly, these pores absorb and hold trace amounts of moisture from humidity, rain, or pool splash-out. As the sun heats the surface, this trapped moisture evaporates, creating a natural cooling effect. It’s a micro-scale version of evaporative cooling, the same principle that makes you feel cooler when a breeze blows over wet skin. This is why field measurements in Arizona show travertine surfaces remain up to 30°F (17°C) cooler than adjacent concrete slabs under the same sun.
This characteristic transforms travertine from a simple building material into a dynamic, living surface. It actively works with the environment to regulate its own temperature. This inherent property, born from its natural structure, is something that manufactured pavers or dense stones simply cannot replicate. It’s the tactile difference between stepping on a sun-baked rock and a surface that feels alive and breathable.
Limestone or Slate: Which Natural Stone Resists Chlorine Fading Better?
Once you move beyond temperature, the next critical consideration for a pool deck is chemical resistance, particularly to chlorine. Pool water is a challenging environment, and not all stones react to it in the same way. The choice between two popular options, limestone and slate, highlights the importance of understanding a stone’s composition. Slate is a metamorphic rock, formed under intense heat and pressure, which generally makes it very dense and chemically inert. This means it is less likely to react with the chemicals in pool water, resulting in minimal color change or fading over time.
Limestone, a sedimentary rock composed mainly of calcium carbonate, is naturally more reactive, especially to acids. This can make it more susceptible to an aggressive water chemistry if the pool’s pH balance is not carefully maintained. However, this is where the quality and density of the stone become paramount. Not all limestone is created equal. A premium, high-density limestone can be surprisingly resilient. As experts in natural stone performance often note, the grade of the stone can trump its general classification.
A dense, high-grade limestone from a reputable quarry may outperform a lower-grade, more friable slate with more impurities, even though slate is generally more chemically inert.
– Pool deck materials experts, Analysis of natural stone performance in pool environments
This comparison shows that while slate is a safer bet by default, a discerning buyer who invests in a top-tier limestone can achieve both a beautiful aesthetic and excellent durability. The following table breaks down the key differences.
| Factor | Limestone | Slate |
|---|---|---|
| Chemical Inertness | Moderate – reactive to acids | High – chemically stable |
| Density Range | Variable (soft to dense) | Generally dense and compact |
| Chlorine Fading Pattern | Uniform lightening if high-grade | Minimal color change |
| Quality Impact | Critical – premium limestone rivals slate | Less variable between grades |
| Pool Chemistry Sensitivity | Higher – requires pH balance | Lower – more forgiving |
| Patina Development | Graceful aging with warm tones | Maintains original color longer |
The iron content mistake that turns your grey stone orange
One of the most disheartening issues homeowners face is watching their beautiful, cool-toned grey stone deck develop unsightly orange or brown rust spots over time. This is almost always caused by iron deposits within the stone itself. Many stones, particularly certain types of sandstone, bluestone, and even some granites, contain trace amounts of iron pyrite. When these deposits are exposed to water and oxygen—an ever-present combination around a pool—they oxidize, creating rust stains that bleed to the surface. This is not a surface stain; it’s an inherent flaw in the stone that is nearly impossible to remove permanently.
The mistake is assuming all stone from a single category is the same. The iron content can vary dramatically from one quarry to another, and even within the same quarry. Relying solely on a small, pristine sample from a showroom is a gamble. A stone’s true character is only revealed when it’s stressed by the elements. Fortunately, there is a simple, effective way to vet your stone selection before committing to an entire palette.
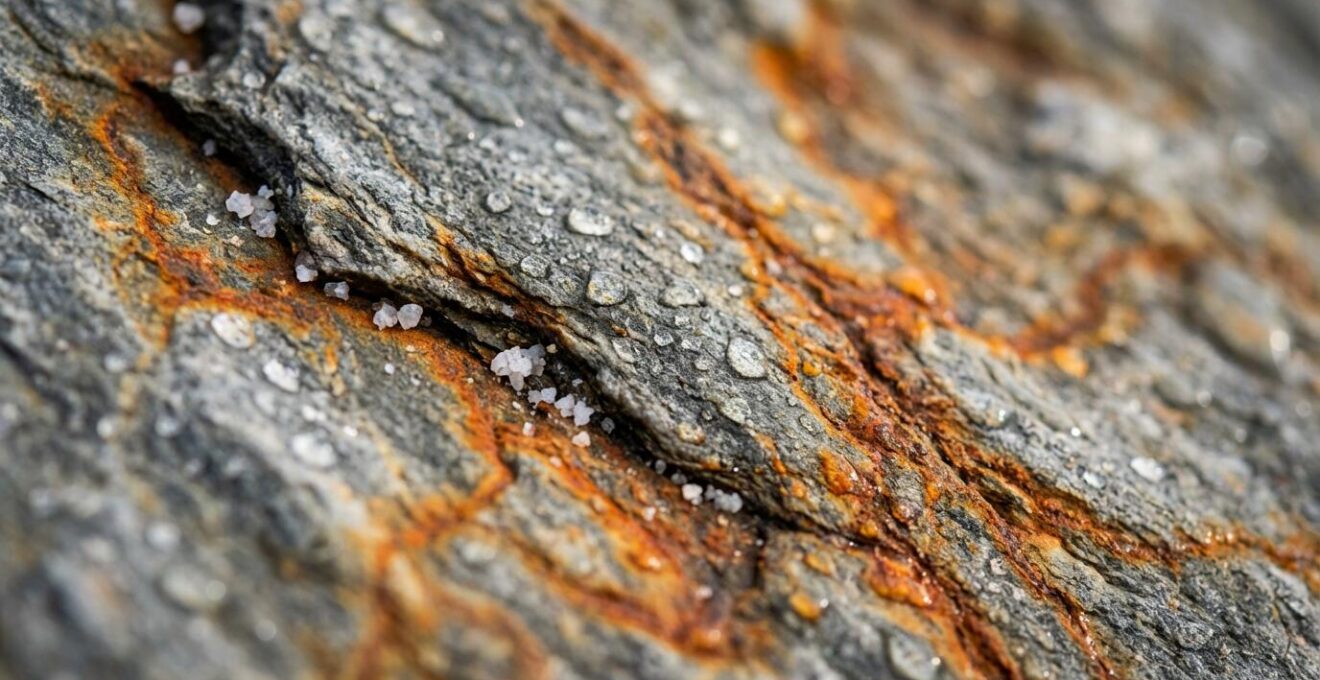
Stone forensics experts recommend a practical pre-purchase stress test to unmask any latent iron issues. As detailed in their analyses, this proactive step can save immense frustration down the line. In a rustic design, a few spots might add to the “aged” character, but for a clean, modern aesthetic, it can be a disaster. The key is to know what you’re getting before the stone is installed.
Pre-Purchase Stress Test for Iron Detection
Before purchasing, experts advise leaving several stone samples outdoors for 2-3 weeks. During this period, wet them repeatedly, especially with salt water if you have a saltwater pool, to accelerate any potential oxidation. This test will quickly reveal whether rust spots will appear from pyrite inclusions (a permanent issue) or from minor surface contamination from cutting tools (which can be treated with oxalic acid cleaners). This simple test provides certainty and prevents a costly mistake.
How to use uncalibrated flagstone for a rustic farmhouse look?
For those seeking a more organic, naturalistic aesthetic, uncalibrated flagstone is an excellent choice. Unlike precisely cut pavers, uncalibrated stones retain their natural thickness variations and irregular shapes, creating a surface that feels like it grew right out of the landscape. Achieving this authentic “rustic farmhouse” look, however, requires more than just laying down random stones. It’s a deliberate design process that balances irregularity with structural integrity. The key is in the details: the joint width, the transition to the pool coping, and the installation method.
The magic of this look often lies in the joints. While standard pavers have tight, uniform gaps, a rustic flagstone deck embraces wide, irregular joints of 1 to 3 inches. This space becomes a design element in itself. For the ultimate rustic feel, these gaps can become “living joints,” planted with durable, low-profile ground covers like creeping thyme or Dymondia. These plants soften the look, enhance the connection to the garden, and feel wonderful underfoot. Alternatively, using a high-quality polymeric sand provides stability while still offering a more natural, textured appearance than standard mortar.
The transition from the irregular deck to the smooth pool edge is another critical detail. Using a thick, rock-faced coping stone helps to visually bridge the gap between the varied heights of the flagstone and the uniform line of the pool. The installation itself must be robust. Setting the stones on a semi-dry mortar bed, often called a “dry-pack,” allows each stone to be individually leveled, creating a solid, shift-free surface despite the inherent irregularities. This method ensures the deck is safe and durable while preserving the charming, imperfect aesthetic that makes this style so appealing.
How to Eliminate Trip Hazards Between the Coping and Decking?
A beautiful pool deck can be ruined by a dangerous and unsightly problem: lippage. This occurs when the pool deck and the coping (the stone edge of the pool) settle at different rates, creating an uneven joint that becomes a serious trip hazard. This differential settlement is a common failure point, and it’s almost always caused by an improperly prepared foundation. The pool shell and the surrounding deck are two separate structures, and unless they are mechanically and structurally integrated, they will inevitably move independently over time.
The professional solution is to create a monolithic foundation. This involves tying the deck’s concrete sub-base directly into the pool’s bond beam (the concrete collar at the top of the pool shell) with steel rebar before the concrete for the deck is poured. This physically locks the two structures together, forcing them to move as a single unit and preventing a vertical shift at the joint. This is the single most important step in ensuring a long-lasting, safe transition between coping and deck.
Proper foundation work doesn’t stop there. The sub-base beneath the entire area must be deep, uniform, and meticulously compacted. A minimum of 6 inches of gravel followed by 2 inches of sand is standard practice, ensuring that the ground has stable, consistent load-bearing capacity under both the coping and the deck. Finally, while tying the structures together prevents vertical movement, you must still account for horizontal thermal expansion and contraction. This is achieved by placing a dedicated expansion joint between the coping and the deck. This flexible joint allows the materials to expand and shrink with temperature changes without cracking or pushing against each other, which would create new forms of lippage.
How to seal natural stone to prevent salt damage without making it slippery?
Sealing a natural stone pool deck is essential, especially for saltwater pools where salt crystals can form inside the stone’s pores and cause spalling or flaking. However, many homeowners are hesitant to seal, fearing they will create a slick, unnatural-looking surface. This fear comes from experiences with older, film-forming sealers that act like a coat of paint, sitting on top of the stone. Modern technology offers a far superior solution: penetrating or impregnating sealers.
Unlike topical sealers, these advanced formulas are designed to absorb deep into the stone. Their molecules are engineered to be both hydrophobic (water-repelling) and oleophobic (oil-repelling). They work by lining the microscopic pores of the stone from within, rather than covering the surface. This creates an invisible barrier that prevents water and salt from penetrating, but it does not alter the stone’s natural texture or finish. The tactile feel of the stone remains, and most importantly, its slip resistance is not compromised. In fact, premium impregnating sealers achieve penetration depths of 8 to 13 millimeters, offering robust, long-lasting protection from the inside out.
Applying these sealers correctly is crucial for success. The process must be done with care, ensuring the stone is clean, dry, and within the correct temperature range. Testing a small, inconspicuous area first is always recommended to confirm there is no unwanted change in appearance. For particularly soft or porous stones like travertine and some limestones in a saltwater environment, it’s wise to go a step further and use a specialized consolidator that strengthens the stone’s internal structure in addition to sealing it.
Action Plan: 5 Steps for Salt-Resistant Stone Sealing
- Choose the Right Product: Select penetrating/impregnating sealers with oleophobic and hydrophobic properties. These line the stone’s pores without creating a slippery surface film.
- Test First: Always test the sealer on a small, hidden area first. Allow it to cure for 24 hours to verify it doesn’t alter the stone’s texture or create an undesirable gloss.
- Apply Correctly: Apply the sealer when the stone’s surface temperature is between 40-95°F (5-35°C). Use a low-pressure sprayer or a lamb’s wool applicator for even coverage.
- Allow Full Cure Time: Be patient. A full cure can take 3-4 weeks as the molecules permanently bond inside the pores. The protection improves significantly during this period.
- Consider a Consolidator: For softer stones (limestone, sandstone, travertine) around saltwater pools, use a specialized consolidator like 40SK for extra protection against salt erosion.
Key Takeaways
- A stone’s coolness comes from a combination of light color (high SRI), textured finish, and, most importantly, its internal porosity which allows for evaporative cooling.
- Long-term beauty depends on proactive choices: vetting stone for iron content before purchase and selecting materials with high chemical inertness for poolside use.
- Proper sealing is not about creating a plastic film; it’s about using a penetrating sealer to protect the stone’s pores from within, preserving its natural texture and slip resistance.
When to pressure wash natural stone vs letting it weather naturally?
The final consideration in owning a natural stone deck is maintenance. There are two philosophies: the pursuit of a perpetually “new” look through regular cleaning, or the appreciation of a “living finish” that embraces natural aging. The choice between pressure washing and letting the stone weather depends entirely on your aesthetic goal and the type of “dirt” in question. Pressure washing is a powerful tool, but it can be destructive if used improperly. It’s effective for removing surface-level organic growth like algae or mildew that can make a deck slippery and unsightly.
However, aggressive pressure washing can damage the stone itself. It can erode the softer parts of the stone, blast out the sand from joints, and even strip away the protective layer of a sealer. A more gentle approach is often better: using a fan-tip nozzle, keeping a safe distance, and pre-treating with a proper stone cleaner. On the other hand, some “weathering” is not damage, but patina. The gradual growth of moss in shady corners, the subtle softening of colors, and the way the stone settles into its environment are all part of the graceful patina that gives natural materials their timeless character. This is the “wabi-sabi” of a stone deck—an acceptance of the beauty in imperfection and age.
The decision, therefore, is a nuanced one. If you have aggressive mildew or slippery algae, a careful, low-pressure wash is a necessary safety and maintenance step. But if you are simply trying to fight the natural, gentle aging of a rustic flagstone patio, you may be working against the very character you sought to create. Embracing the natural weathering process, especially with rustic or farmhouse designs, allows the stone to tell a story and truly merge with the surrounding landscape.
To choose the stone that will not only stay cool but also age beautifully, the first step is to apply the core principles of thermal performance. Re-evaluating these fundamentals with your specific climate and aesthetic in mind will ensure you make a choice that you’ll love for decades.