Contrary to the belief that pool materials are interchangeable, creating a true, lasting free-form pool is an act of structural sculpture where the medium is non-negotiable.
- Wet-mix shotcrete offers superior consistency and density, creating a monolithic shell without weak points—essential for organic curves.
- The long-term value of a shotcrete pool far exceeds alternatives, being appraised as a permanent landscape feature, not a liability.
Recommendation: Focus on the builder’s expertise in rebar engineering, nozzle application, and the non-negotiable 28-day curing process, as these are the true markers of a quality free-form pool.
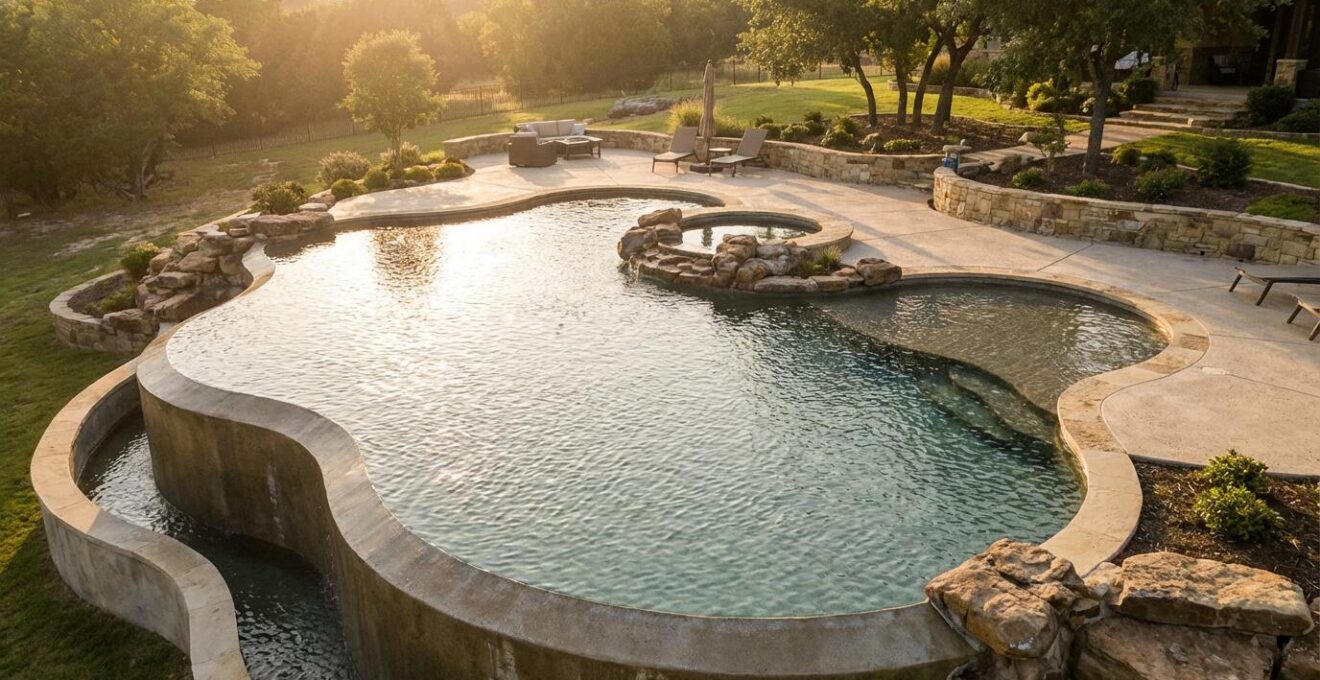
You envision it clearly: not a simple rectangle of blue, but a flowing, organic lagoon that integrates seamlessly with your landscape. A grotto tucked behind a waterfall, a winding lazy river, or a beach entry that disappears into the water. This is the dream of a free-form pool. Many will suggest simpler paths—vinyl liners that can be stretched into kidney shapes or pre-molded fiberglass shells. These are options for creating a non-rectangular pool, certainly. But they are not options for creating a true, timeless piece of structural art.
The conventional approach views pool building as assembling parts. The visionary approach, however, understands it as a form of sculpture. The critical distinction lies in the medium. For a design that flows with the unconstrained creativity of water itself, you need a material that can be both fluidly applied and become unyieldingly permanent. This is not about compromise or finding the “good enough” solution. It’s about recognizing that for complex, high-value aquatic architecture, there is only one medium that offers both plasticene-like flexibility during creation and monolithic strength for generations.
This is where shotcrete moves from being a construction material to an artistic medium. It is the key that unlocks the ability to translate a unique vision into a permanent hardscape feature. This guide explores the non-negotiable technical reasons why shotcrete stands alone. We will deconstruct the process, from the creation of the structural skeleton to the final, durable finish, to demonstrate why the path to a truly exceptional free-form pool is paved—or rather, sprayed—with shotcrete.
To fully grasp the intricacies of this process, this article is structured to walk you through the critical stages of a master-built shotcrete pool. The following summary outlines the key artistic and engineering decisions that ensure your vision becomes a permanent, structurally sound reality.
Summary: The Sculptor’s Guide to Shotcrete Pool Construction
- How long must shotcrete cure before you can apply the waterproof finish?
- How to tie rebar cages for shotcrete to prevent structural voids?
- Shotcrete (Wet) or Gunite (Dry): Which Mix Ensuring Higher Compression Strength?
- The spraying error that creates weak spots in your pool walls
- When to increase wall thickness beyond standard 6 inches for deep ends?
- How to Ensure Structural Integrity on Clay Soil Without Spending a Fortune?
- Why Reinforced Concrete Pools Maintain Value Better Than Vinyl Liners Over 20 Years?
- How to Choose Mosaic Tiles That Won’t Pop Off After Three Winters?
How long must shotcrete cure before you can apply the waterproof finish?
The creation of a shotcrete shell is an act of controlled chemistry, not just placement. The moment the material is sprayed, a process called hydration begins, where cement particles react with water to form the crystalline bonds that give concrete its incredible strength. Rushing this stage is the single most common mistake that compromises the longevity of a pool. While the surface may feel hard within a day, achieving its full design strength is a meticulous, patient process. Think of it not as “drying,” but as “maturing.”
Industry standards are unequivocal on this point. True structural integrity and the impermeability required for a watertight vessel demand a slow, moist curing process. According to the American Shotcrete Association and National Plasterer’s Council standards, a minimum of 28 days of continuous moist curing is required. This isn’t passive waiting; it’s an active process of managing moisture to ensure the chemical reaction completes fully, minimizing shrinkage cracks and maximizing surface hardness for the finish to bond to.
Applying a waterproof finish like plaster or tile to “green” or insufficiently cured concrete is a recipe for failure. Trapped moisture will try to escape, causing delamination, blistering, and efflorescence (the chalky white deposits that appear on the surface). This is why a disciplined, documented curing and verification protocol isn’t optional; it’s the foundation of a lasting finish.
Action Plan: Professional Moisture Verification Protocol
- Days 1-7: The shell is most vulnerable. Soak the shotcrete surface 3-5 times daily with a fine mist from a garden hose, maintaining a dark, damp appearance to ensure high relative humidity.
- Days 7-28: The rate of hydration slows, but is still critical. Continue water curing at least once daily to ensure the cement achieves over 85% of its potential hydration.
- Day 28+: The eye is not a reliable tool. Before any coating is considered, test the concrete’s moisture content with a professional digital moisture meter at multiple locations (deep end, shallow end, steps).
- Verification: The goal is to verify that the moisture content is below the 4% threshold (or the specific requirement of the waterproofing material manufacturer) before proceeding.
- Documentation: Record all moisture readings at key locations. This documentation is a critical part of quality assurance and is often required for warranty compliance on high-end finishes.
How to tie rebar cages for shotcrete to prevent structural voids?
Before a single ounce of shotcrete is sprayed, the soul of the pool is formed. This is the rebar cage—the steel skeleton that gives the structure its tensile strength and dictates the final, flowing form. For a free-form design, this is not a crude grid; it is a meticulously hand-tied sculpture, where every bend, overlap, and tie contributes to the creation of a monolithic mass. The goal is to create a three-dimensional web of steel that shotcrete can fully encapsulate, leaving no voids or shadows.
The placement of this steel is a science. The bars must be held a precise distance from the excavated soil—typically a minimum of 3 inches—to ensure they are completely encased in concrete. This prevents water from ever reaching the steel, which would cause rust and “concrete cancer.” This critical spacing is maintained by small plastic supports called “chairs” or “dobies.” In the hands of an artist-builder, the rebar cage for a lagoon pool looks like a piece of complex metal latticework, with bars bending smoothly around curves and extra reinforcement added at high-stress points like coves and benches.
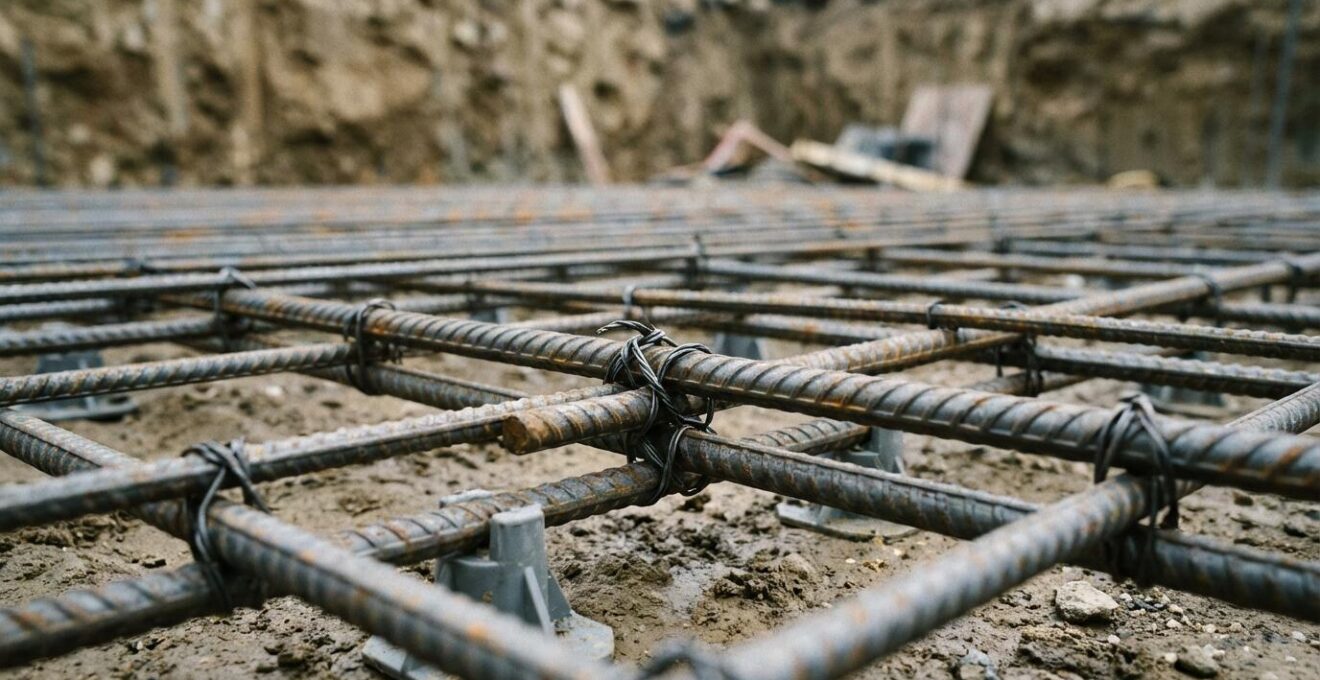
The density and complexity of this steel skeleton is precisely why shotcrete is the only choice. The high-velocity application ensures the concrete mix is driven behind and around every single bar, creating a single, solid structure. Any other method, like simply pouring concrete, risks creating shadows and voids behind the rebar, which become catastrophic weak points. For tight curves (those with a radius under 3 feet), lighter, more flexible #3 bars (3/8″) are often used, while #4 bars (1/2″) form the main structure, ensuring the skeleton perfectly matches the intended organic shape.
Shotcrete (Wet) or Gunite (Dry): Which Mix Ensuring Higher Compression Strength?
The terms “shotcrete” and “gunite” are often used interchangeably, but they describe two fundamentally different processes with significant implications for the quality of a free-form pool. Both are methods of pneumatically applying concrete, but the difference lies in *when* the water is added. Gunite is a dry-mix process where dry cement and sand are blown through a hose, and water is added by the nozzleman at the moment of application. Wet-mix shotcrete, conversely, uses concrete that has been precisely mixed with water at a batch plant, delivered to the site, and then pumped through the hose.
For the artist-builder focused on ultimate consistency and strength, wet-mix shotcrete is the superior medium. The reason is control. With shotcrete, the water-to-cement ratio—the single most critical factor for concrete strength—is guaranteed by a computer at the batch plant. Every truckload is identical. With gunite, this crucial ratio is left to the moment-by-moment judgment and skill of the nozzleman, introducing a significant variable. While a highly skilled gunite operator can achieve great results, the process is inherently less predictable.
This consistency translates to a denser, less porous final product. The following table highlights the key performance differences that matter most in creating a high-strength, monolithic shell.
| Performance Metric | Wet-Mix Shotcrete | Dry-Mix Gunite |
|---|---|---|
| Compressive Strength Range | 4,000-8,000 PSI | 4,500-9,000 PSI |
| Mix Control | Computer-batched at plant | Nozzleman-controlled on site |
| Rebound Rate | 5-10% | 15-30% |
| Quality Testing | Slump test on every truck | Limited to post-application cores |
| Consistency | Guaranteed water-cement ratio | Variable based on operator skill |
Case Study: J Designs Pool 14-Year Comparison
J Designs Pool and Spa’s long-term documentation revealed that while both methods can produce quality pools, the pre-batched consistency of wet-mix shotcrete consistently resulted in predictable 6,000-7,000 PSI strength. Critically, they noted the lower rebound rate of wet-mix (less than 10%) indicates a more efficient transfer of energy, leading to a denser final structure. This density is especially vital for ensuring complete encapsulation around the complex rebar configurations found in free-form designs.
Ultimately, while gunite can achieve high compressive strengths, the guaranteed consistency and lower rebound of wet-mix shotcrete make it the more reliable choice for creating the flawless, monolithic mass required for a sculptural pool.
The spraying error that creates weak spots in your pool walls
The application of shotcrete is where the science of the mix meets the craft of the application. This is the stage of the nozzleman’s artistry. A great nozzleman isn’t just a laborer; they are a sculptor, using a high-pressure stream of concrete to build up the pool’s form layer by layer. Their technique is the difference between creating a single, unified structure and a wall full of hidden weaknesses.
The most devastating error is improper nozzle angle. The nozzle must always be held perpendicular to the receiving surface. If the nozzleman angles the stream, especially in the tight coves and curves of a free-form design, the material can create “laminations.” These are thin, distinct layers that do not bond together properly, like a poorly made pastry. They create planes of weakness within the wall that can lead to failure years down the line. Another critical error is failing to manage “rebound”—the aggregate and cement that bounces off the wall upon impact. A second worker with a high-pressure air lance must constantly blow this loose material away so it doesn’t get trapped in the structure.
This critical role of the skilled applicator is best summarized by an industry expert.
The nozzleman’s skill is critical. An incorrect angle creates laminations (layers that don’t bond) instead of a single monolithic mass, particularly problematic in concave curves or coves of free-form pools.
– Bill Drakeley, President of Drakeley Industries, AQUA Magazine
An experienced project manager or homeowner can spot signs of poor technique in real-time. This includes watching for an inconsistent spray pattern, listening for changes in the compressor sound that suggest blockages, and looking for areas that appear dry or are sloughing off the wall. Ensuring the nozzleman is ACI (American Concrete Institute) certified is the first line of defense against these costly errors.
When to increase wall thickness beyond standard 6 inches for deep ends?
In structural sculpture, form follows function, and mass must follow pressure. The standard wall thickness for a residential shotcrete pool is 6 inches, which is perfectly adequate for vertical walls in the shallow areas. However, a free-form pool is rarely that simple. The immense pressure exerted by thousands of gallons of water is not uniform; it increases dramatically with depth. To ignore this fundamental law of physics is to design a failure.
Professional engineering guidelines provide a clear rule of thumb: for every foot of depth beyond 8 feet, the wall thickness should be increased by 1 inch. This means a 10-foot deep end should have an 8-inch thick wall at its base. This graduated thickness ensures the structural sculpture has the necessary mass to counteract the highest hydrostatic pressure where it’s most concentrated. It’s a detail that is invisible in the finished pool but is absolutely critical to its structural longevity.
This principle becomes even more important at transition points. Where a wall meets the floor, a gentle, radiused curve is used to distribute stress. Creating a sharp 90-degree angle, as seen in some basic pool designs, creates a massive stress concentration point that requires significantly more thickness and reinforcement to avoid cracking. Free-form designs, with their deep ends, integrated spas, and sweeping curves, demand this kind of engineered approach to wall thickness.
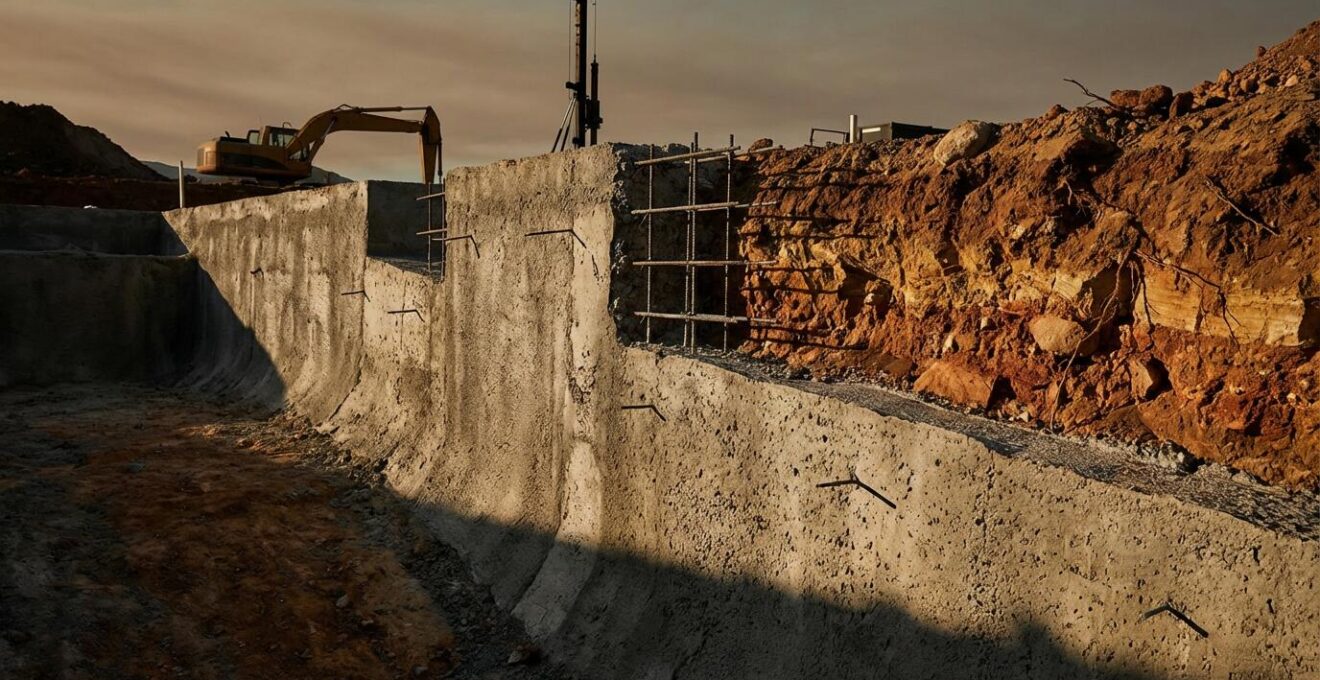
This visualization shows how a properly engineered pool shell is not a uniform bucket, but a carefully sculpted form with thickness precisely tailored to the forces it must endure. This is why a “one-size-fits-all” approach is insufficient for custom designs; the structure must be engineered for its specific shape and depth. In fact, some professional guidelines from Pool Engineering professionals recommend to add 1 inch of thickness for every foot of depth beyond 8 feet, a testament to the importance of this detail.
How to Ensure Structural Integrity on Clay Soil Without Spending a Fortune?
Building a heavy, water-filled structure on expansive clay soil is like trying to create a masterpiece on a shifting canvas. Clay soils swell when wet and shrink when dry, exerting immense force that can lift, crack, and destroy a poorly designed pool shell. The traditional, brute-force solution is to install a forest of deep-drilled concrete piers, a process that can add tens of thousands of dollars to a project. However, a more elegant and cost-effective solution lies in the inherent strengths of shotcrete’s monolithic design.
The superior strategy is to create a structural system that “floats” on the unstable soil rather than fighting it. This is achieved by combining a stable base with the unified strength of a shotcrete shell. The process involves over-excavating the pool area by 12-24 inches and replacing the clay with a thick base of compacted structural gravel. This creates a stable, well-draining platform that decouples the pool from the most volatile soil movements. A perimeter French drain system is then installed to intercept groundwater and prevent it from saturating the clay near the pool walls.
Case Study: The Monolithic Advantage on Expansive Soils
The American Shotcrete Association has documented that monolithic shotcrete shells are inherently superior for unstable soil conditions. Unlike panelized pools with multiple joints that can fail under stress, a continuous shotcrete structure distributes loads uniformly across its entire surface. This allows the shell to effectively “float” as a single unit on the expansive soil. Their case studies demonstrate that combining this monolithic design with a structural fill base and proper drainage can reduce soil-related structural failures by up to 85%, while often costing 60% less than extensive deep pier systems.
By leveraging the unique, seamless strength of a shotcrete shell, a builder can design a pool that works *with* the challenging soil conditions, not against them. This intelligent engineering approach provides superior long-term security without the exorbitant cost of over-engineering with deep piers.
Why Reinforced Concrete Pools Maintain Value Better Than Vinyl Liners Over 20 Years?
A swimming pool is one of the few home improvements that can be either a significant asset or a perceived liability. The difference often comes down to the construction method. A custom shotcrete pool is not viewed by the real estate market as an accessory; it is appraised as a permanent hardscape feature, much like a stone patio or a high-end outdoor kitchen. A vinyl liner pool, however, is often seen as temporary, with a built-in cycle of costly replacements.
While the initial investment for a shotcrete pool is higher, the 20-year total cost of ownership and its impact on property value tell a very different story. A vinyl liner will need to be replaced, on average, every 5-9 years, at a significant cost each time. A shotcrete pool’s plaster surface may need to be refinished once every 15-20 years, but the underlying structure is permanent. This fundamental difference in longevity is directly reflected in how appraisers value the property.
This long-term financial reality is stark when you compare the total investment over two decades.
| Cost Category | Concrete/Shotcrete Pool | Vinyl Liner Pool |
|---|---|---|
| Initial Installation | $65,000-$125,000 | $45,000-$80,000 |
| Liner Replacements (20 years) | N/A | $12,000-$18,000 (3 replacements) |
| Resurfacing/Replastering | $10,000-$15,000 (once) | N/A |
| Annual Maintenance | $2,500 × 20 = $50,000 | $1,500 × 20 = $30,000 |
| 20-Year Total | $125,000-$190,000 | $87,000-$128,000 |
| Property Value Impact | +5-8% permanent | +2-3% (seen as liability) |
The most telling metric is the last row. The permanent nature of shotcrete construction translates directly into higher property value. In fact, professional appraisers consistently report that concrete pools add 5-8% vs 2-3% for vinyl liner pools to property value. A vinyl pool is often flagged as a “deferred maintenance liability,” a future cost for the new owner, which can negatively impact the appraisal. A shotcrete pool is a legacy investment in the property itself.
Key Takeaways
- The wet-mix shotcrete process provides computer-batched consistency, ensuring predictable strength and density crucial for the integrity of free-form designs.
- A disciplined, 28-day moist curing period is not an optional wait time but a non-negotiable chemical process required to achieve maximum strength and prevent surface failures.
- A shotcrete pool is appraised as a permanent hardscape feature that adds significant, lasting value to a property, unlike temporary solutions which can be seen as liabilities.
How to Choose Mosaic Tiles That Won’t Pop Off After Three Winters?
The final finish of a pool—the tile and plaster—is the visible skin of the structural sculpture. It’s where the project’s beauty is most apparent. However, in climates with freeze-thaw cycles, this beautiful skin can become a maintenance nightmare if the wrong materials and methods are used. The primary enemy is water absorption. When water penetrates a tile or the grout, freezes, and expands, it exerts incredible force that can “pop” tiles right off the wall.
The defense against this begins with tile selection. Not all tiles are created equal. For a pool environment, especially in colder climates, it is essential to select only porcelain or glass tiles that are rated as “frost-proof.” This rating is determined by their water absorption rate. To withstand winter conditions, frost-proof pool tiles must maintain less than 0.5% water absorption rate. Anything higher will act like a tiny sponge, inviting winter damage.
However, the right tile is only half the battle. The installation system is just as critical. The shotcrete shell must be fully cured (28 days) and verified to be dry (under 4% moisture content). The thin-set mortar used to adhere the tiles must be a high-performance, polymer-modified formula specifically rated for submerged, freeze-thaw conditions (look for the ANSI A118.15 specification). Finally, flexible expansion joints must be installed at regular intervals (every 8-12 feet) and at every transition point, like where the tile meets the pool coping. These joints allow the structure to expand and contract with temperature changes without transferring that stress to the tile field. This complete system—the right tile, the right mortar, and the right joints—is the only way to ensure the pool’s beauty is as enduring as its structure.
Your vision for a one-of-a-kind pool deserves more than a standard solution. To ensure your dream is built with the artistry and structural integrity it commands, the next step is to partner with a builder who treats shotcrete not as a material, but as a medium for sculpture.